"Skinny Mexican Taco Lasagna"

This "Skinny Mexican Taco Lasagna" was inspired by a post a friend made on Facebook as I sat scrolling one night..

Immediately upon seeing it the light-bulb went off and I started scribbling out ideas for ingredients and options..


I love when a recipe comes about that way, with just the slightest nudge and prodding by my imagination..

I love it even better when it’s successful and delicious, like this fusion of Mexican & Italian inspired cuisine using low fat, low carb, high protein ingredients that still pack so much flavor that you’re kids will never know the difference..

This is one your family is sure to love, so take "Taco Tuesday" to the next level and try this one out for you and your family—because it is, oh so  "Definitely Delish"


"Skinny Mexican Taco Lasagna"

Ingredients:
1 pound ground Beef, 90% lean
1 pound ground Turkey, 93% lean
2 (16 oz.) jars Chunky Salsa (homemade or favorite brand choice)
1 (7 oz.) bag 2% Sharp Cheddar, shredded
1 (7 oz.) bag 2% Colby Jack, shredded
1 (7 oz.) bag 2% Mexican Mix Cheese, shredded
2 (14 oz.) cans Fire Roasted Diced Tomatoes, drained
1/2  teaspoon Onion powder
1 to 2 packages of low sodium Taco seasoning mix (use more or less to taste)
2 packages "Toufayan Bakery" Lavash Flatbread, Whole Grain with Flax (low-carb)
Sea Salt & Black Pepper, to taste
1 (16 oz.) container Low fat Sour Cream
4 to 6 ounces low fat Cream Cheese
1 tablespoon fresh chopped Parsley, plus more for garnish
1 teaspoon fresh chopped Cilantro, plus more for garnish
Fresh sliced Jalapeno pepper for garnish

Directions:
1. Pre-heat your oven to 350 degrees Fahrenheit and take out a 9 x 13 inch baking pan or dish and grease the insides with butter or a non-stick baking spray..
2. Take ground beef and turkey and saute until browned. Season with taco mix blend, onion powder, and a pinch of sea salt and pepper to taste, until evenly coated.. 
3. Add half a can of fire roasted tomatoes, two teaspoons of chopped parsley and a 1/2 teaspoon of cilantro. Mix together, then set aside till ready to use..
4. Next take the Lavash flatbread wraps and separate or cut them into even strips to fit your pan or baking dish (The Lavash Flatbread I buy comes in 2 serving sheets with a perforation in the center—3 servings fit my pan perfectly but you may need to cut or slice depending on brand), these will make up your "lasagna" noodle substitutes. You should end up with 9 pieces if using my brand otherwise it could range up depending on how you slice the Lavash wraps to make your noodle substitutes..
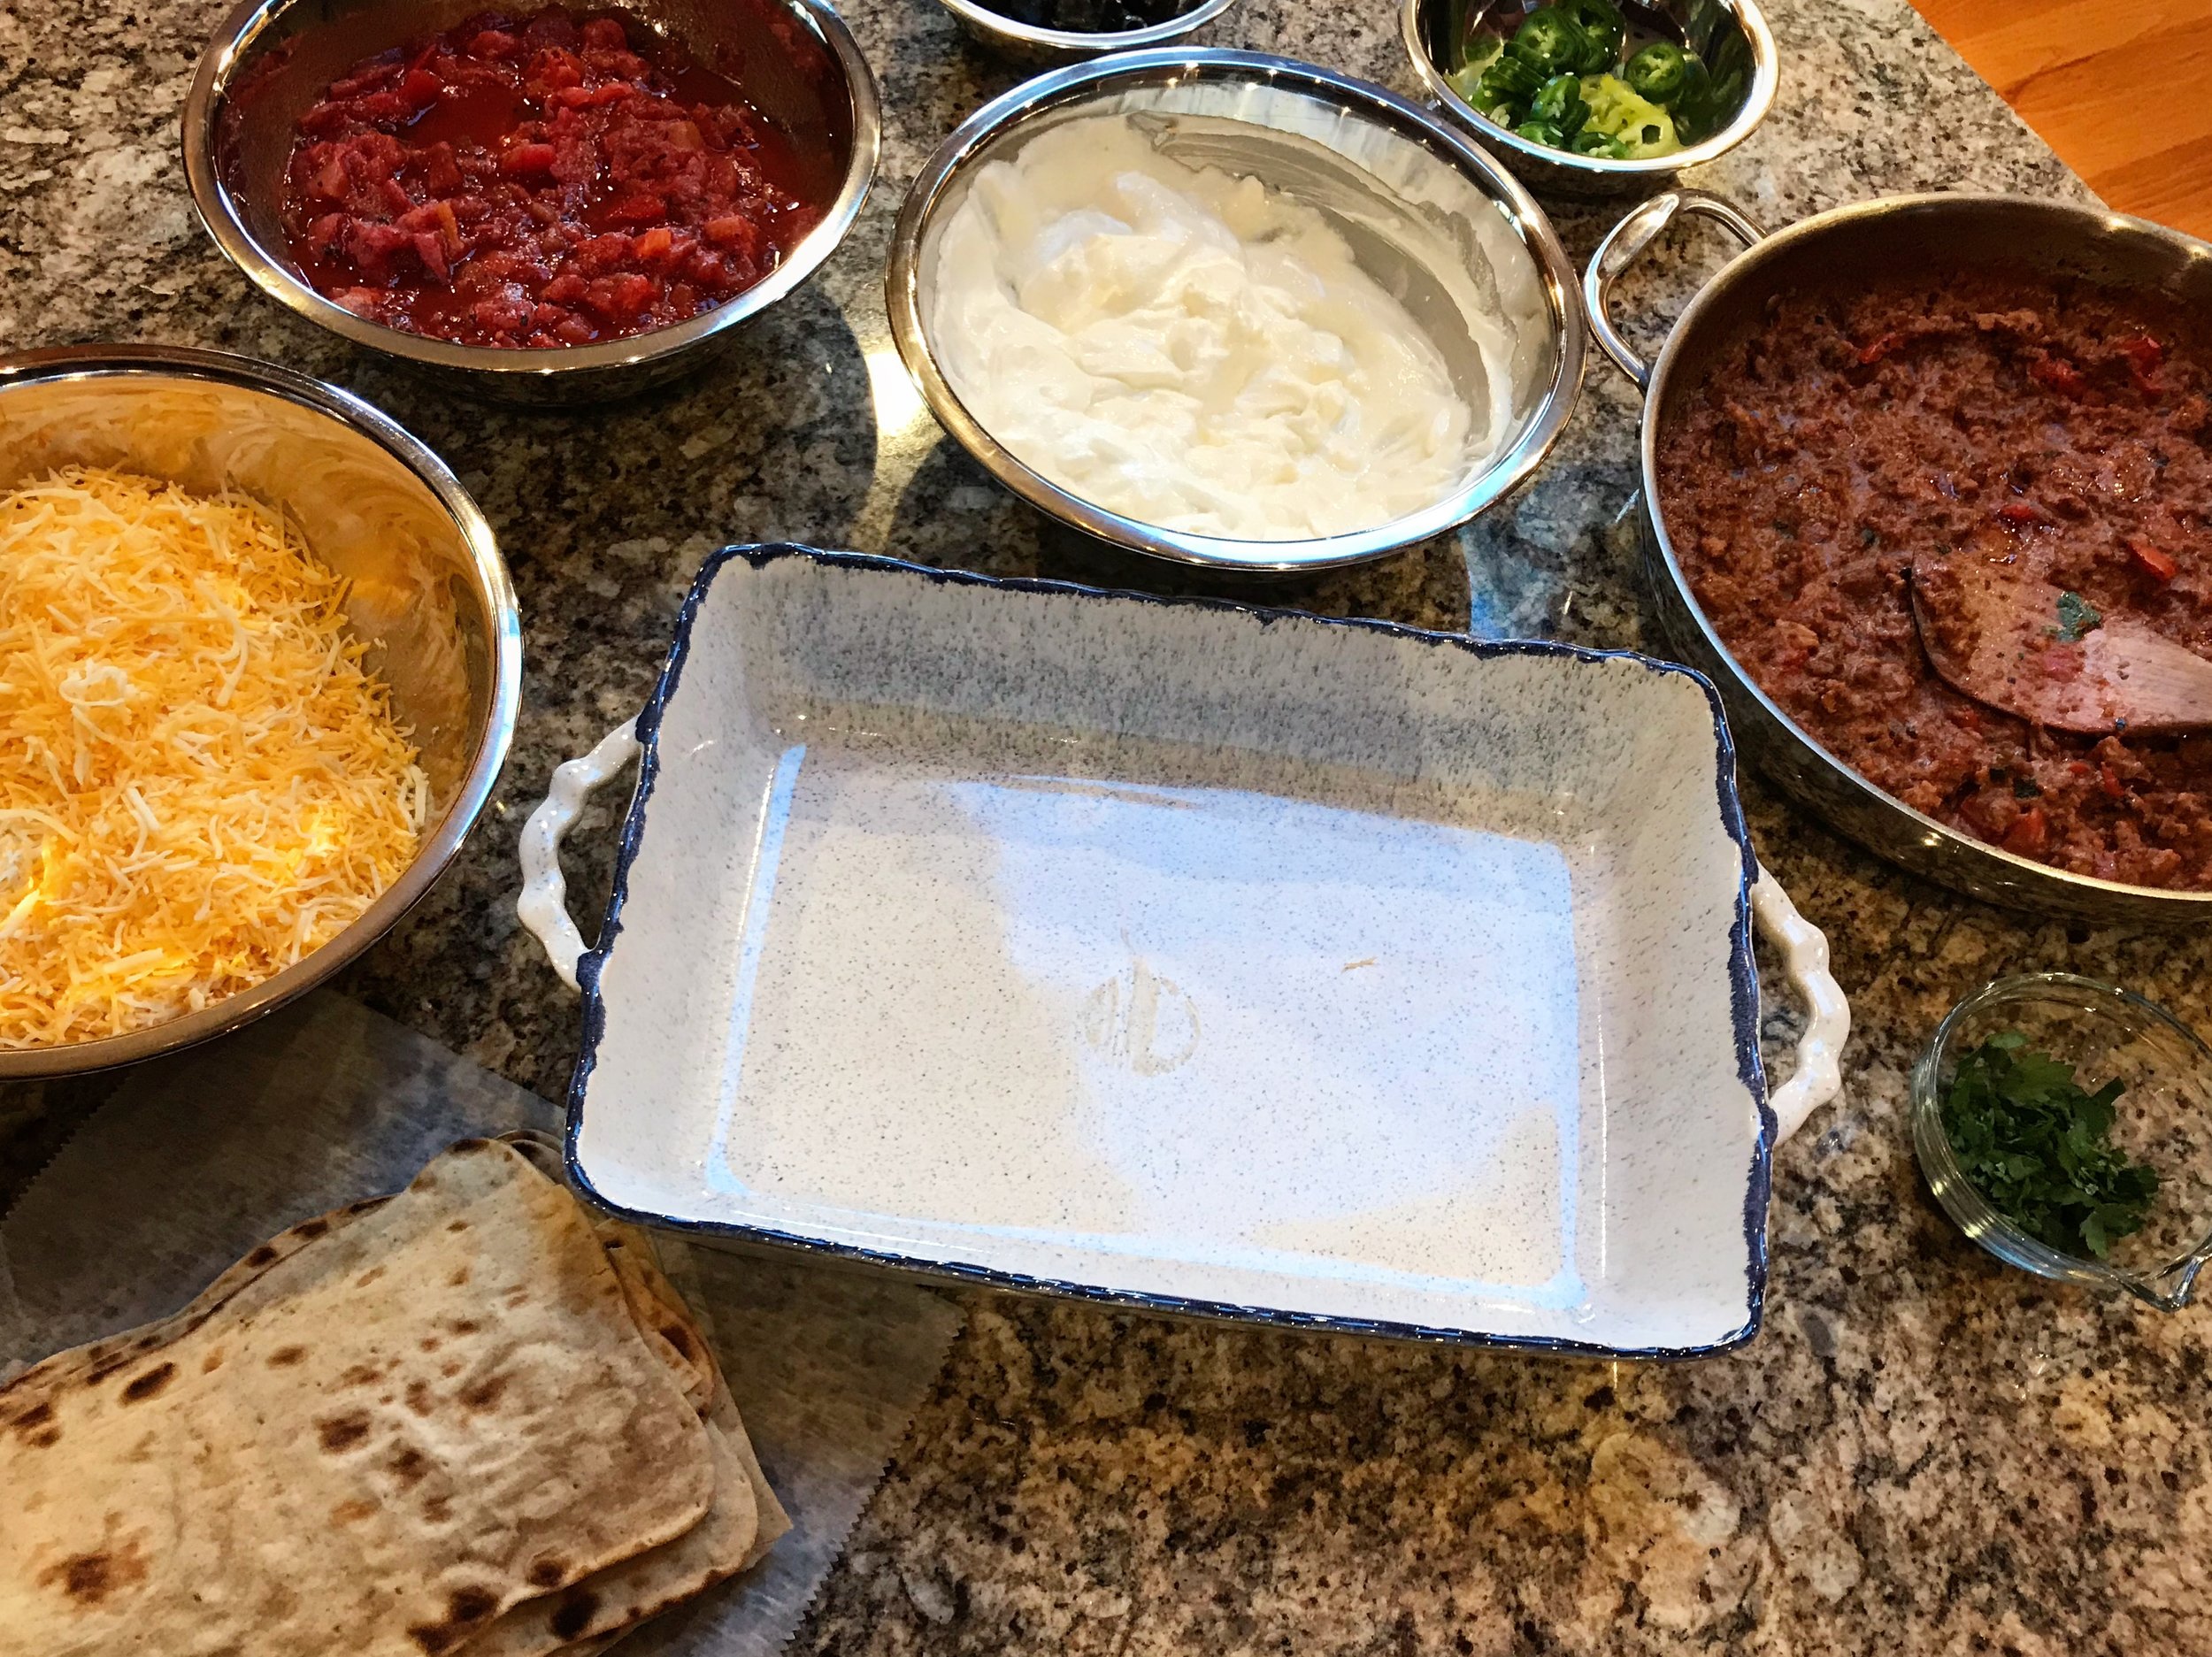
5. Now, in a bowl, mix together the 2 jars of chunky salsa with 1 1/2 cans of drained fire roasted tomatoes. In another bowl, mix the bags of low fat shredded cheese together in preparation—and finally mix 12 ounces of sour cream and 4 to 6 ounces of low fat cream cheese together until blended smooth..

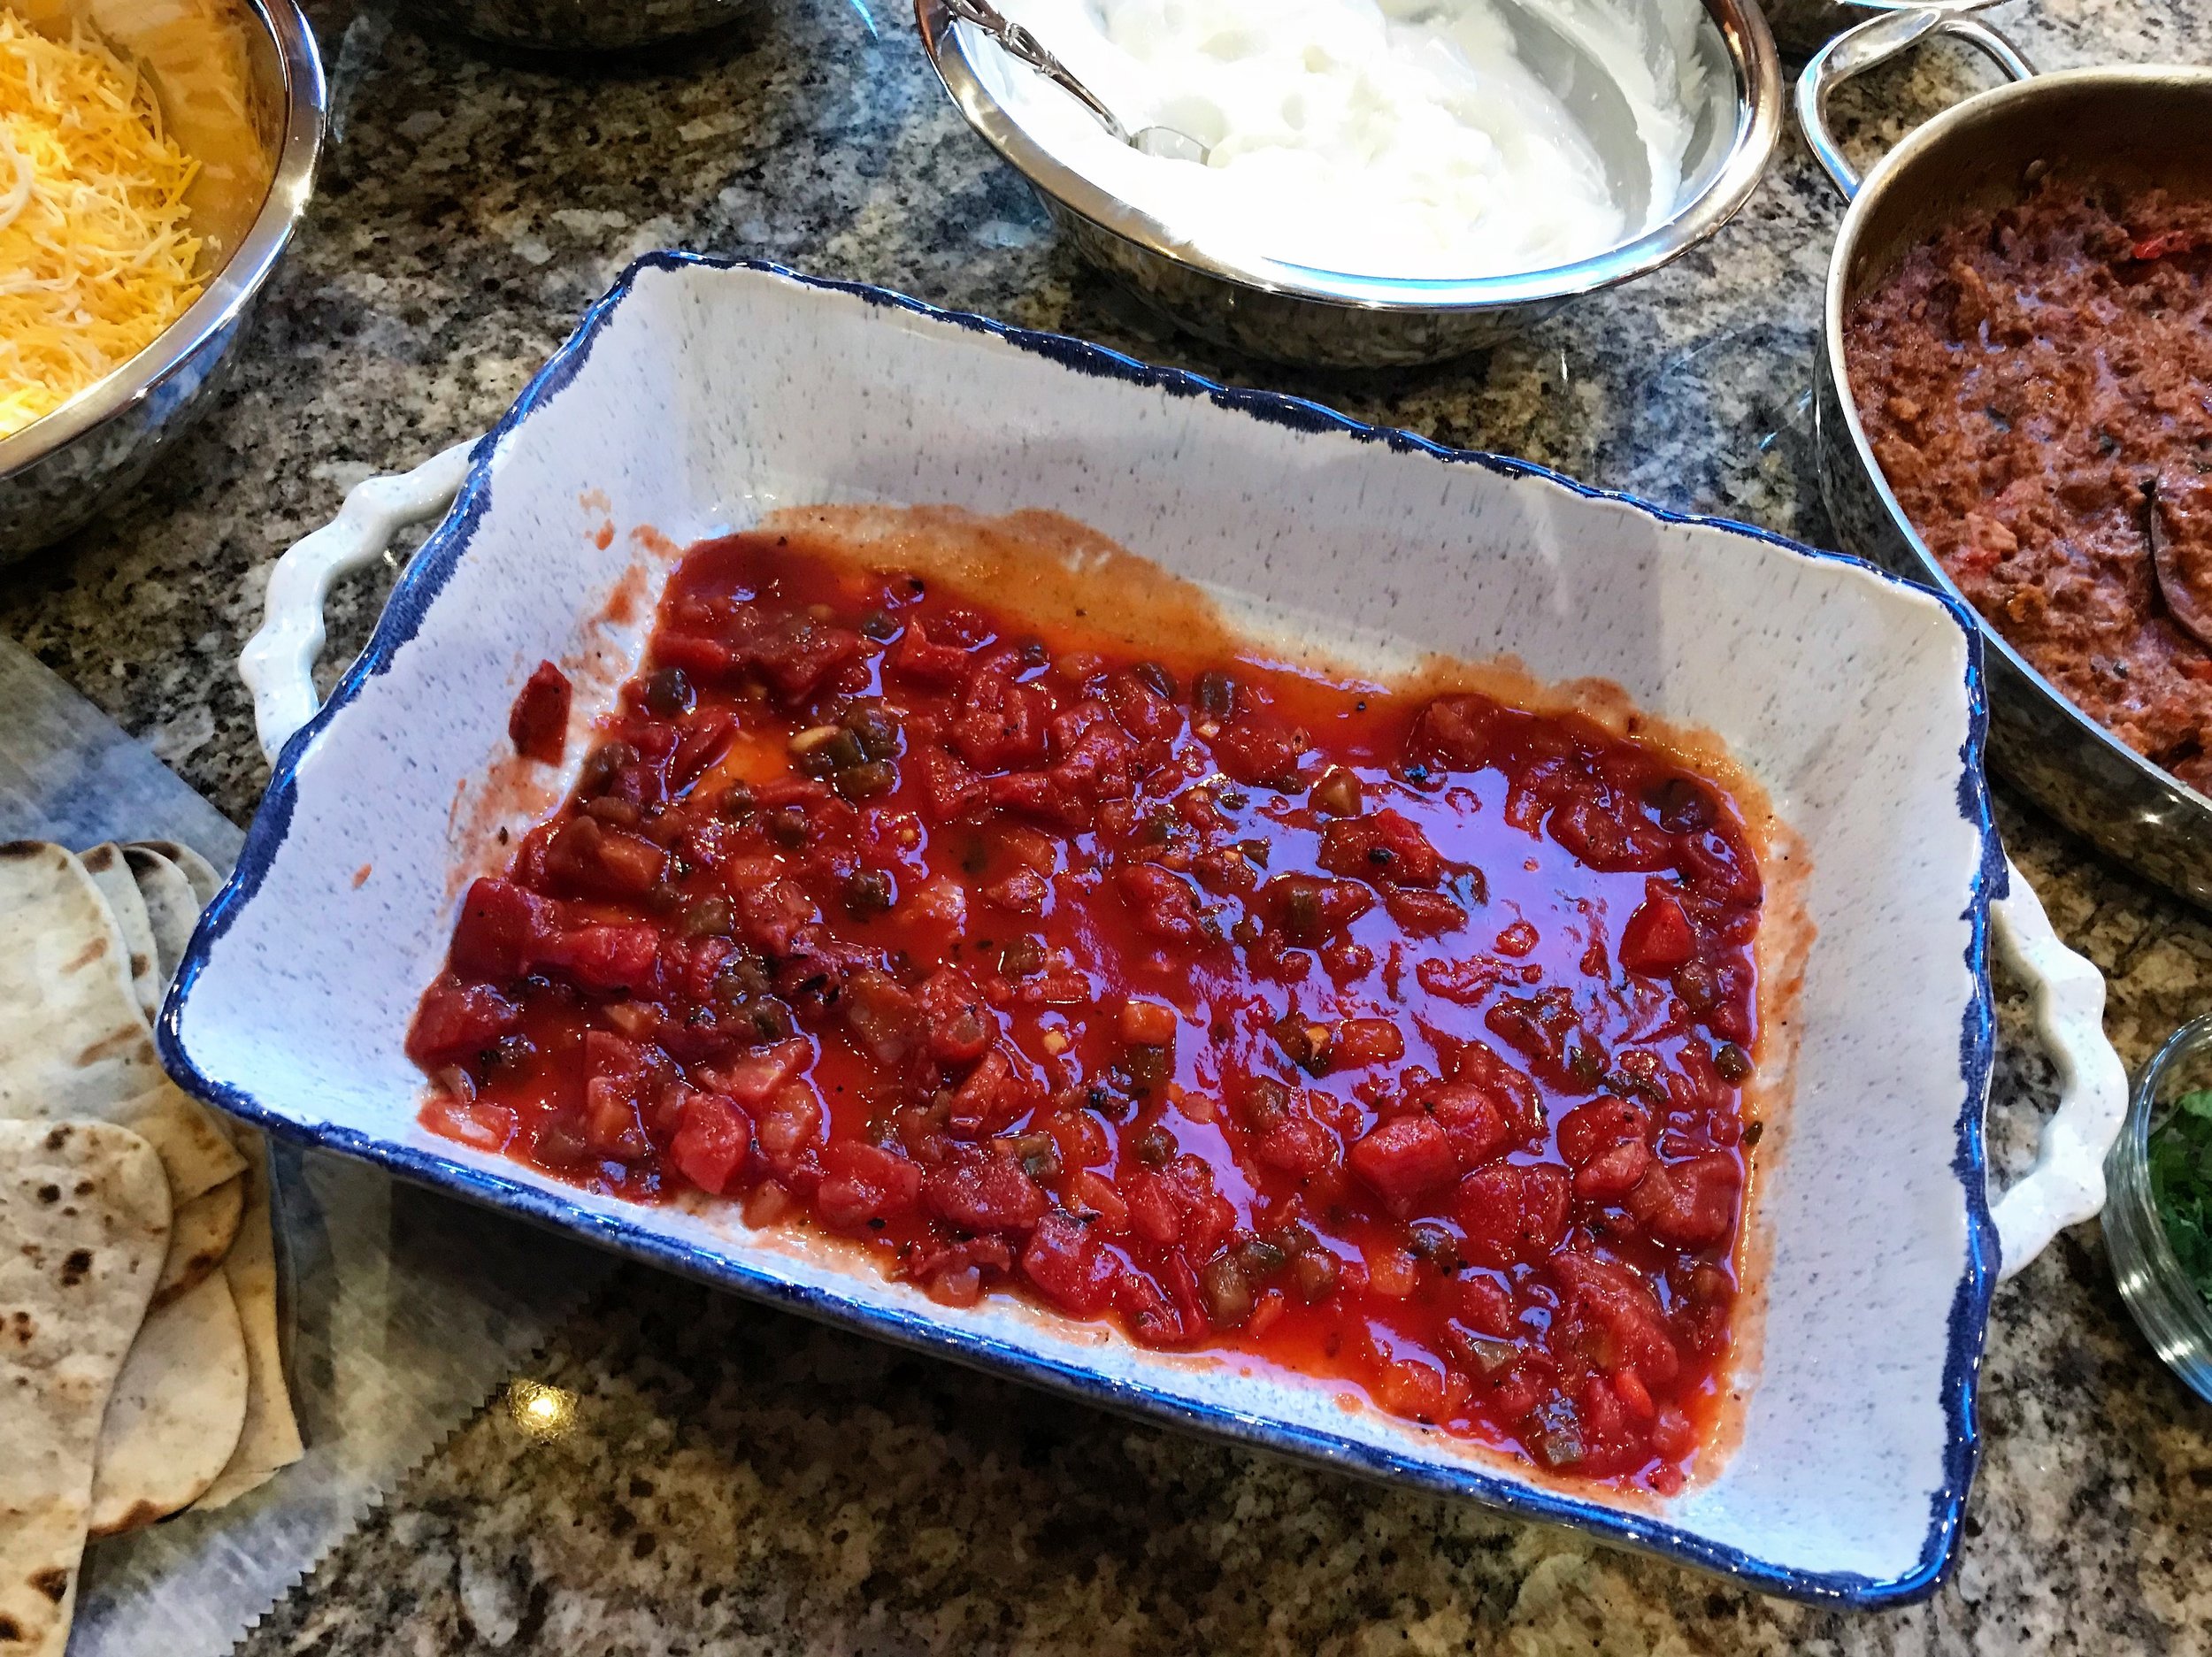
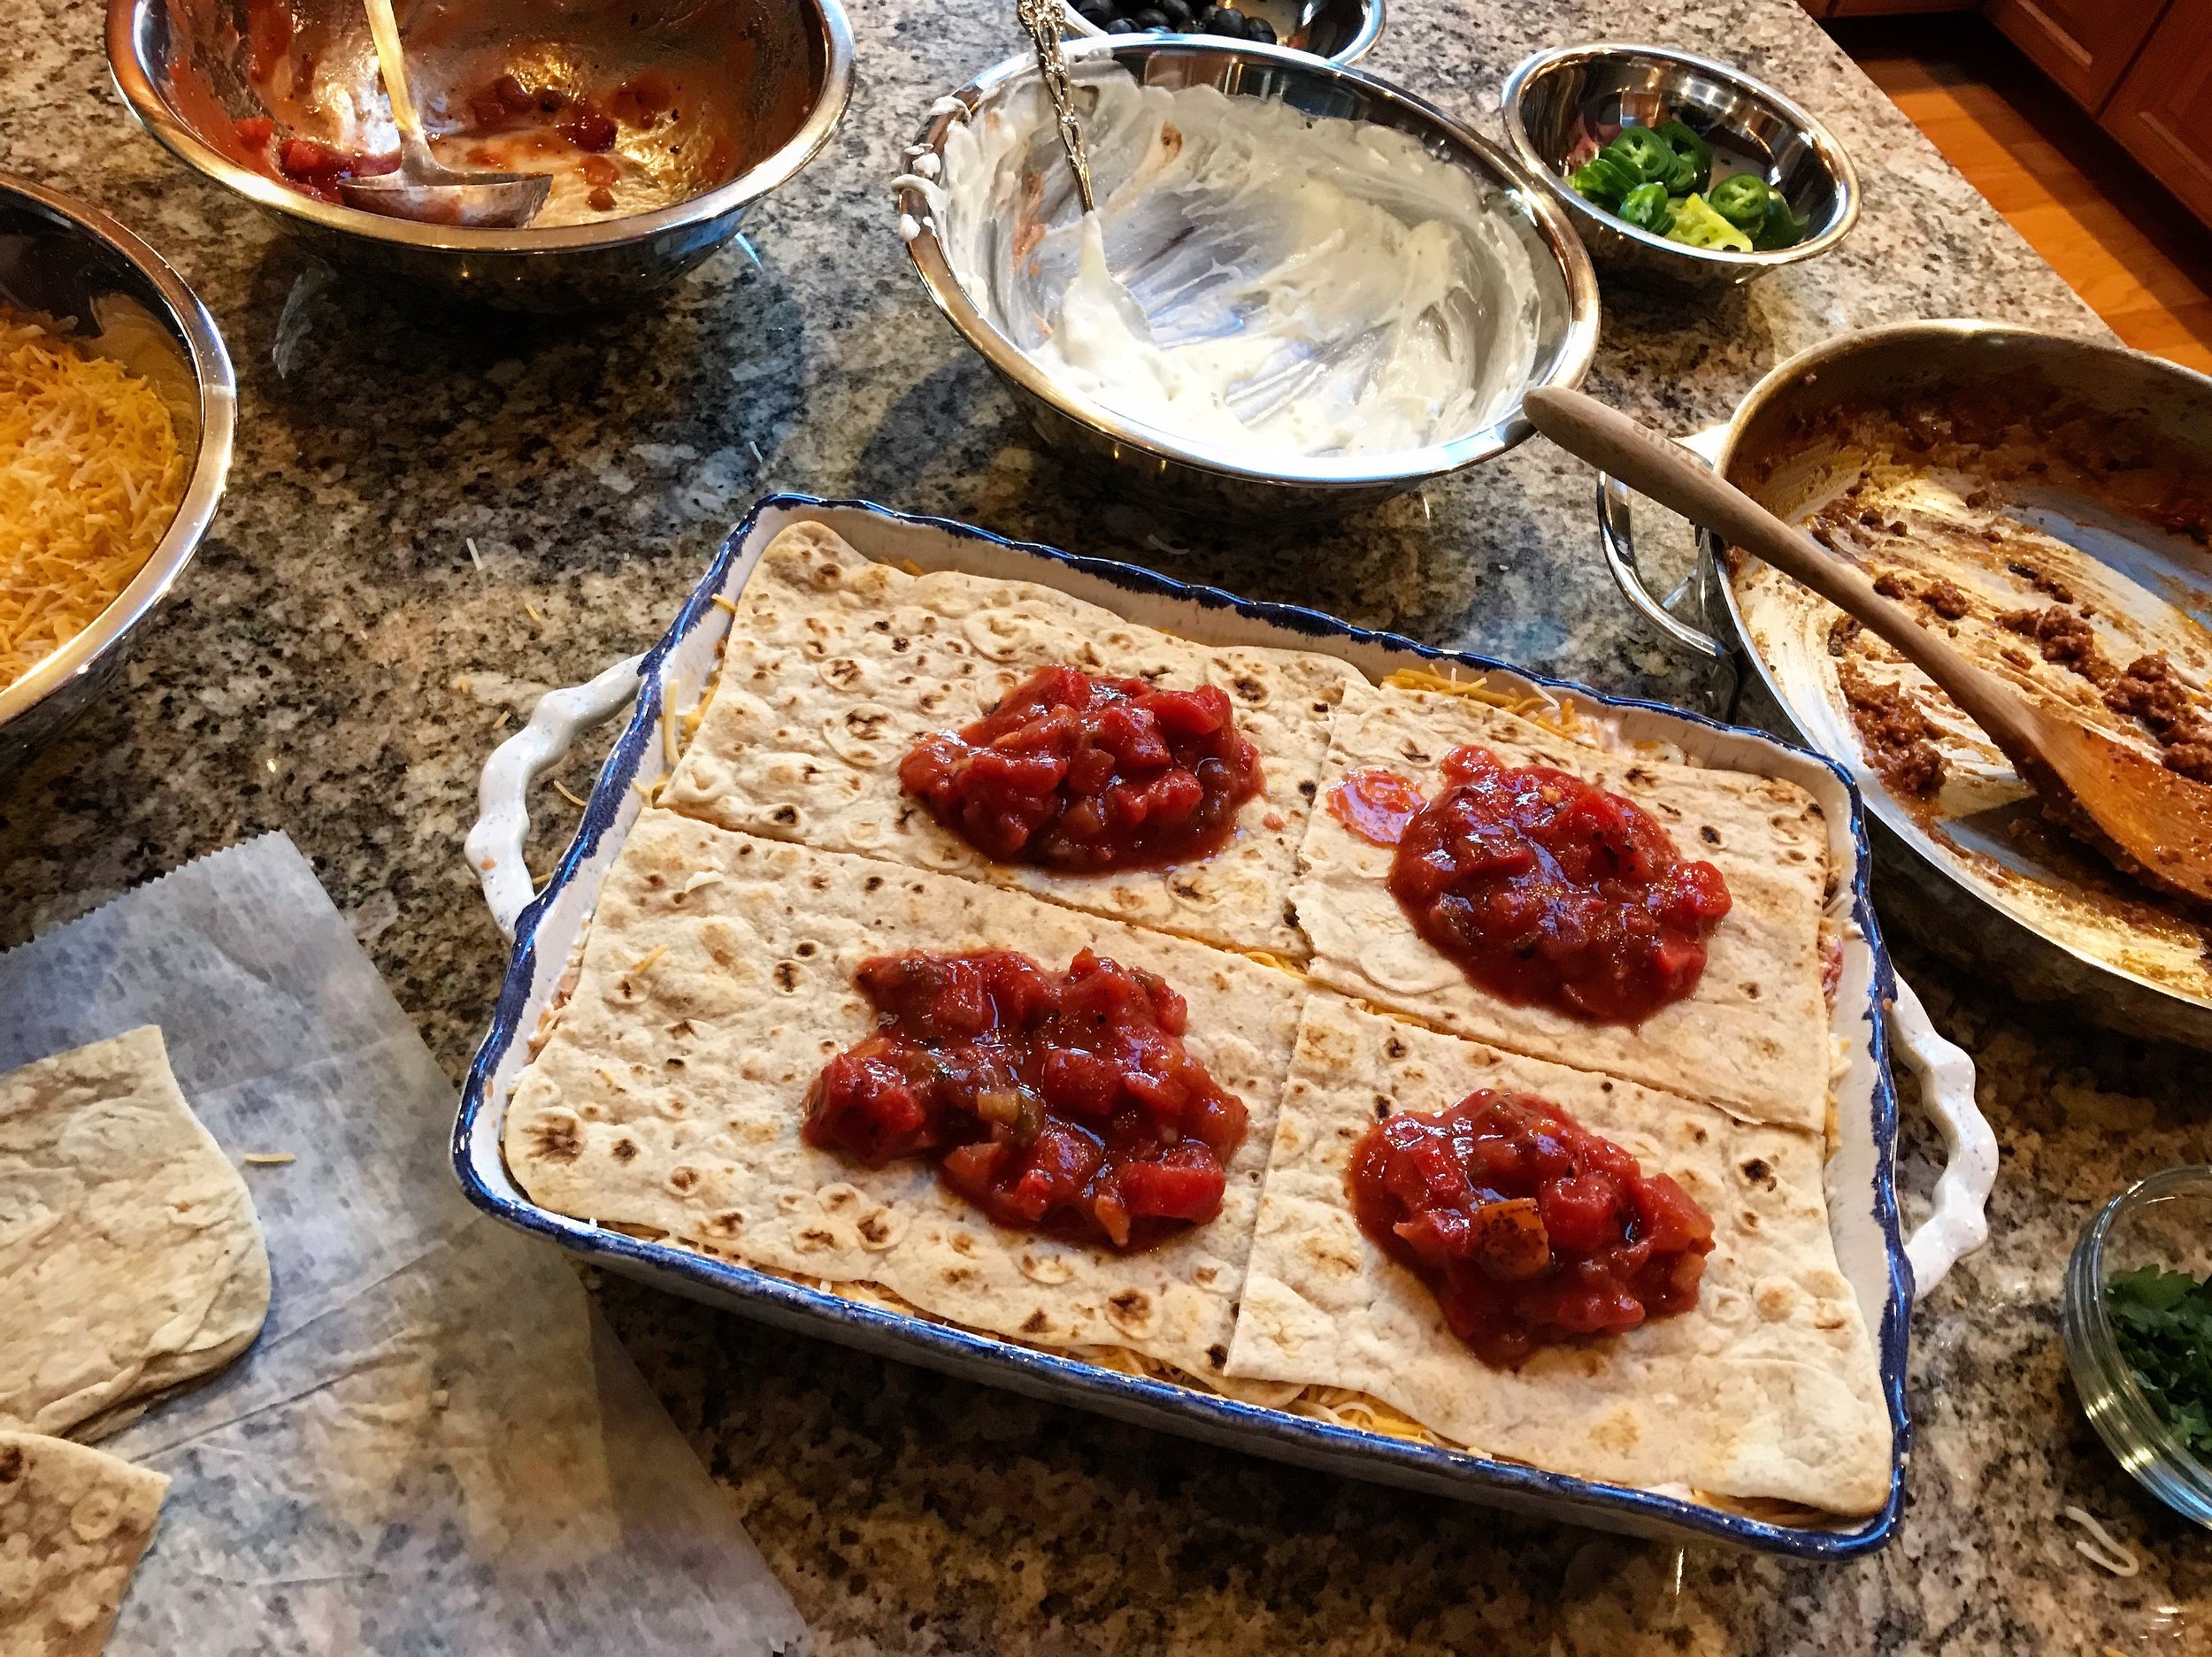
6. To begin layering, start by ladling out 2/3 of a cup of salsa mix evenly into the bottom of your baking dish (I'll usually give the tray a few shakes back and forth to help spread the salsa). Then cover it with strips of the cut Lavash flax roll ups..
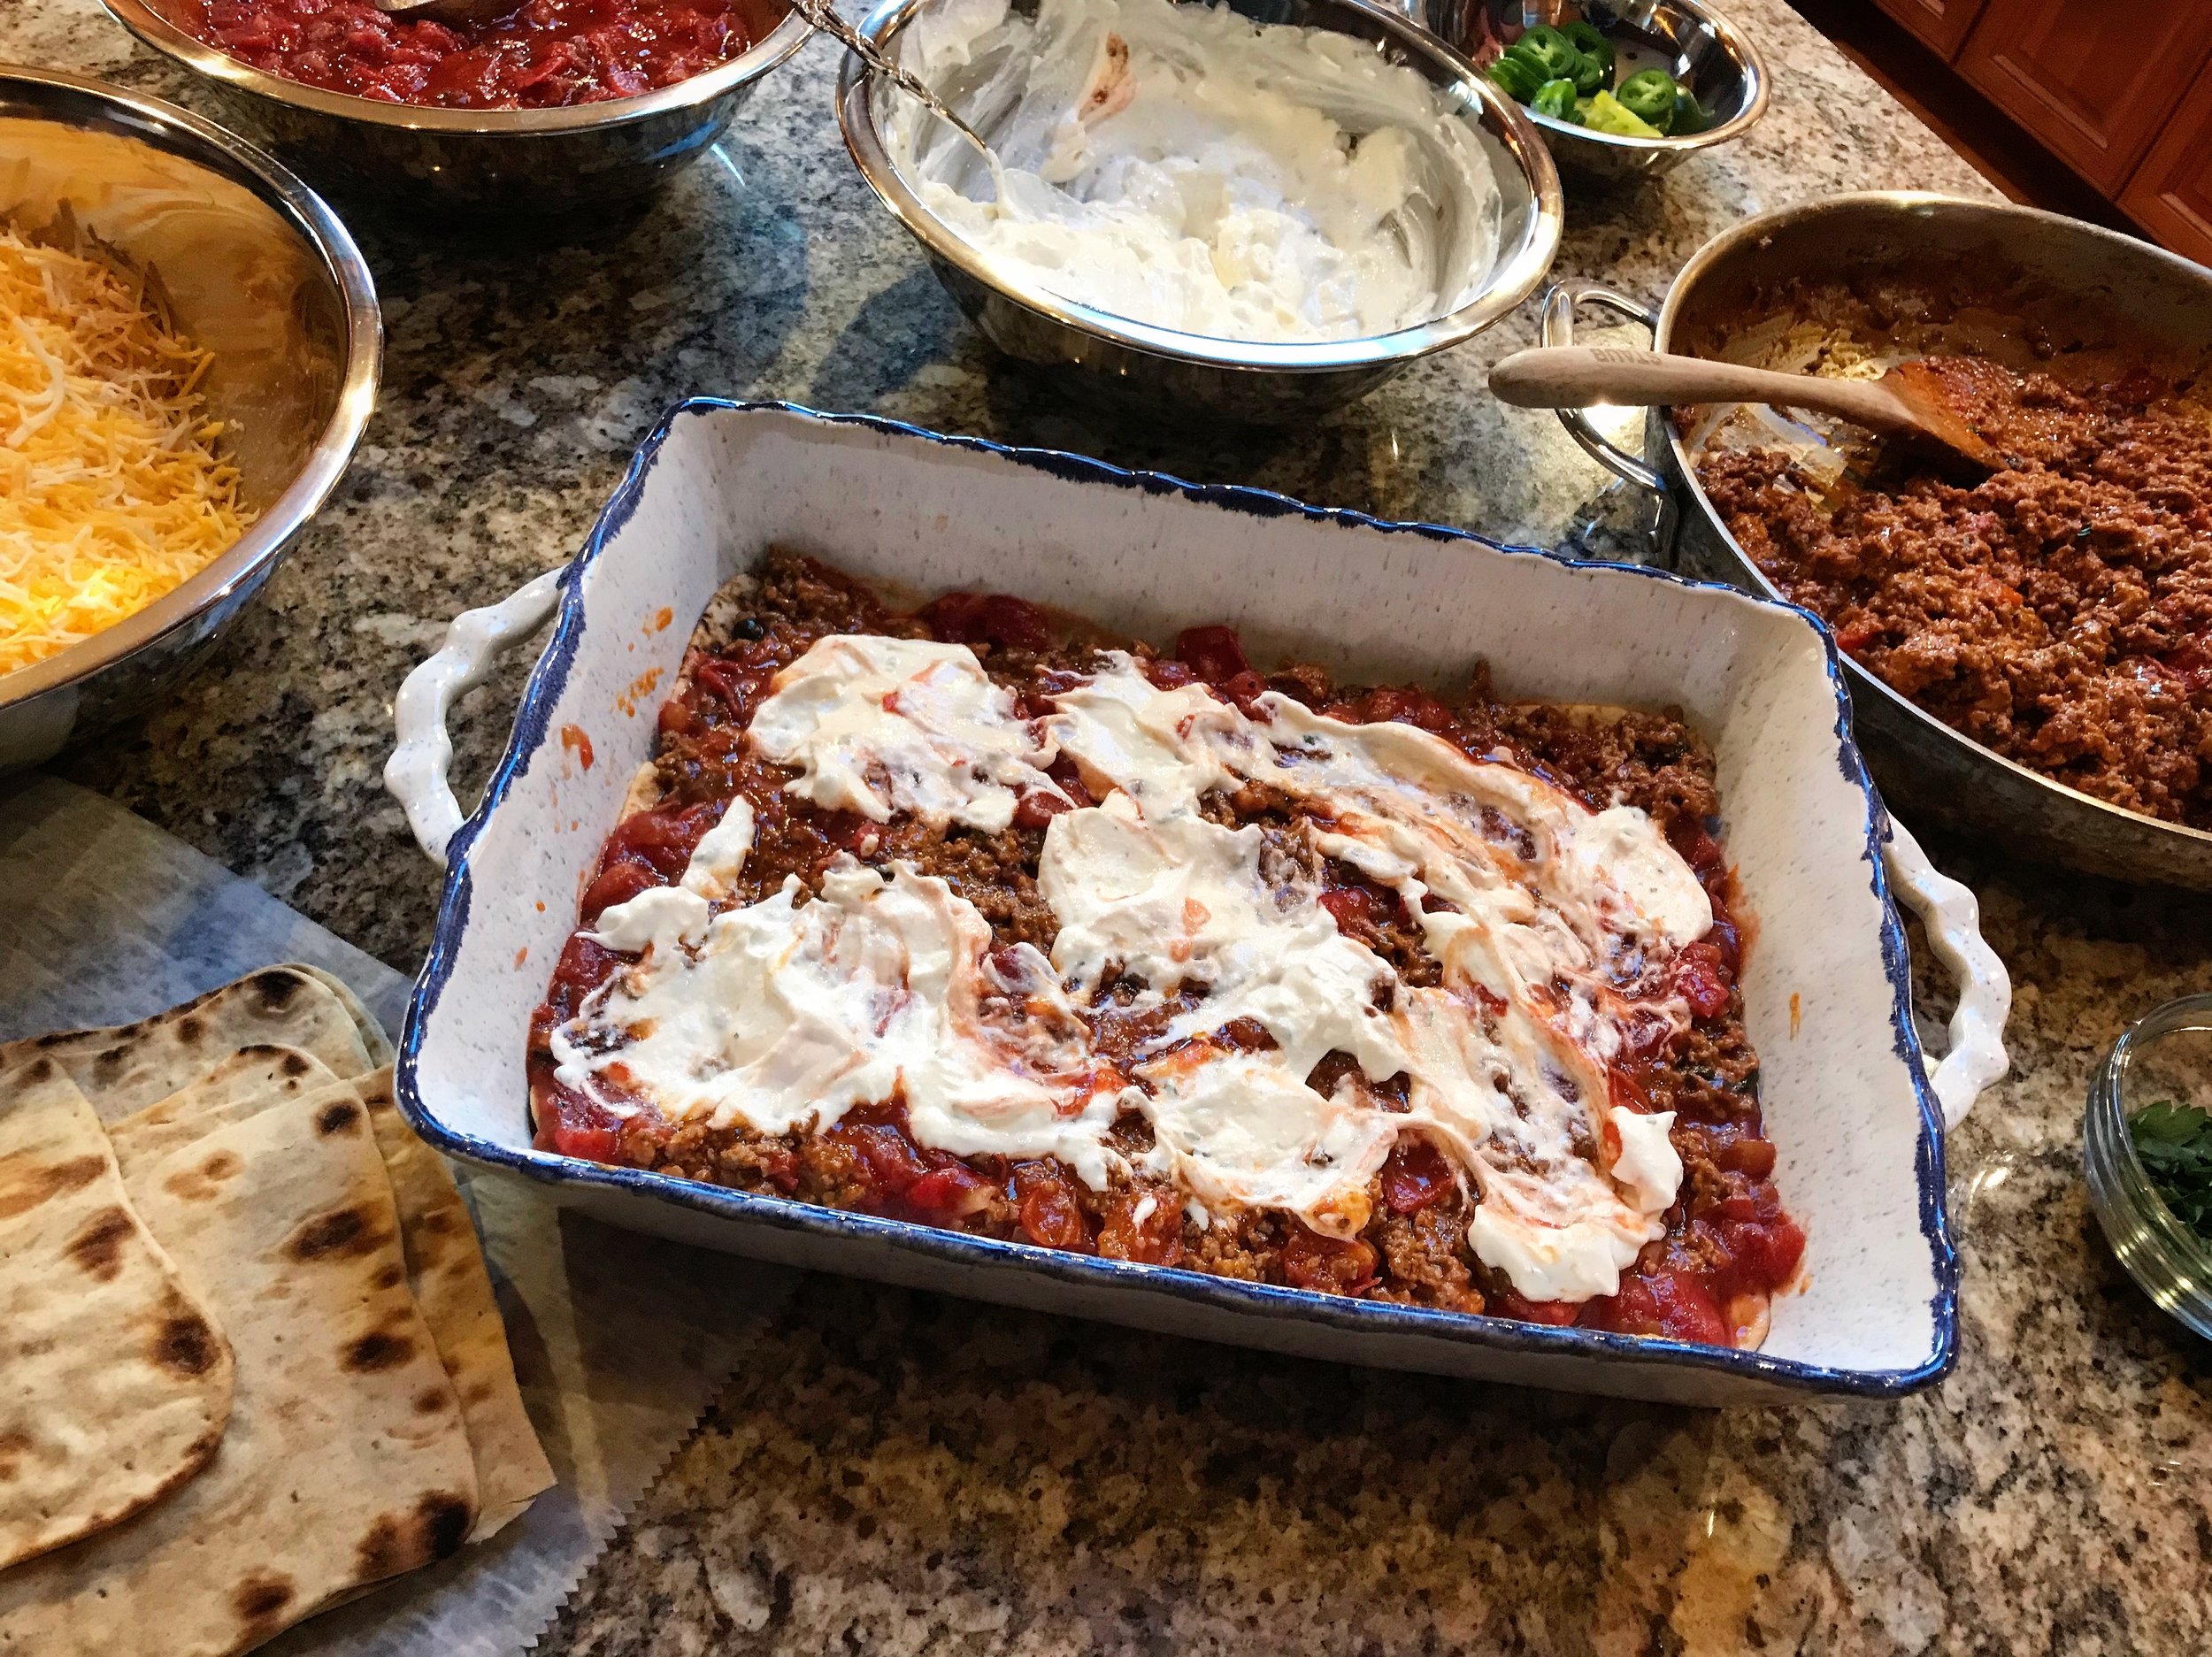
7. Cover the strips of Lavash flax roll ups with about 1/3 of the taco meat mixture, spreading it evenly. Follow that with some of the cream cheese and sour cream mixture. Cover that with a 2/3 of a cup of the salsa and tomatoes, then 1/4 of the total amount of shredded cheese..
8. Repeat with another layer of Lavash bread strips, taco meat, sour cream mixture, salsa and shredded cheese until only salsa and cheese remain..
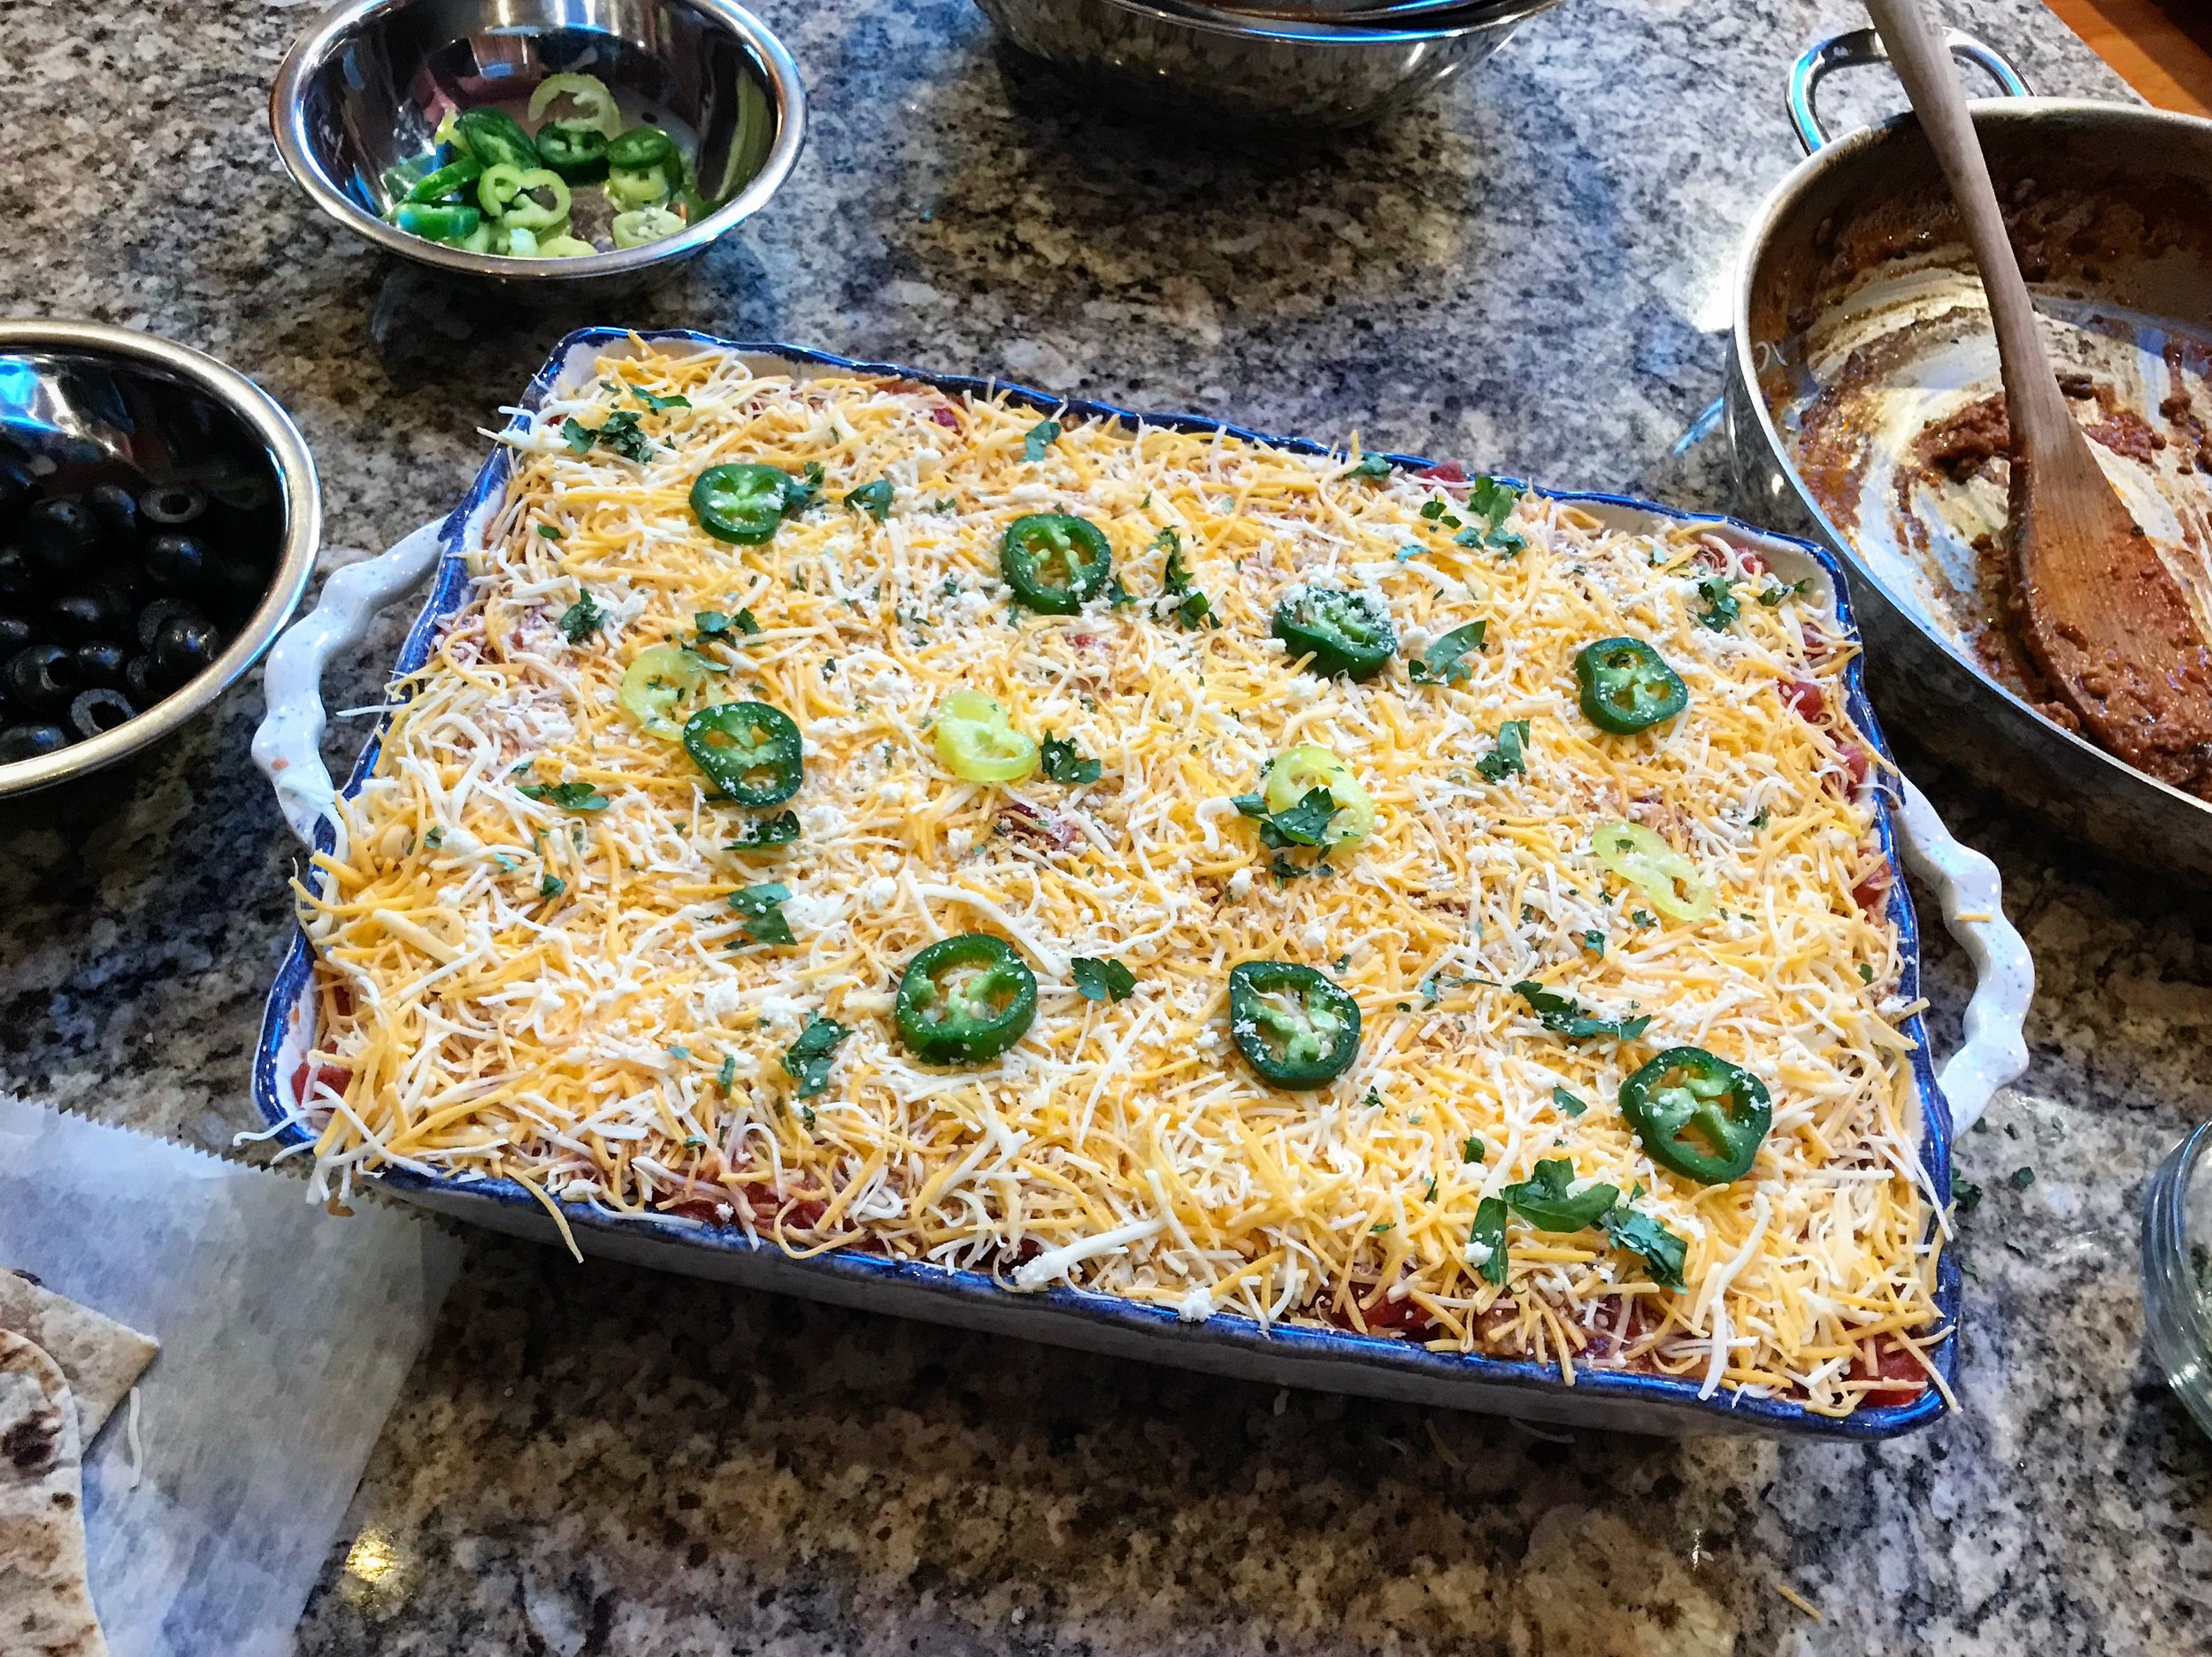
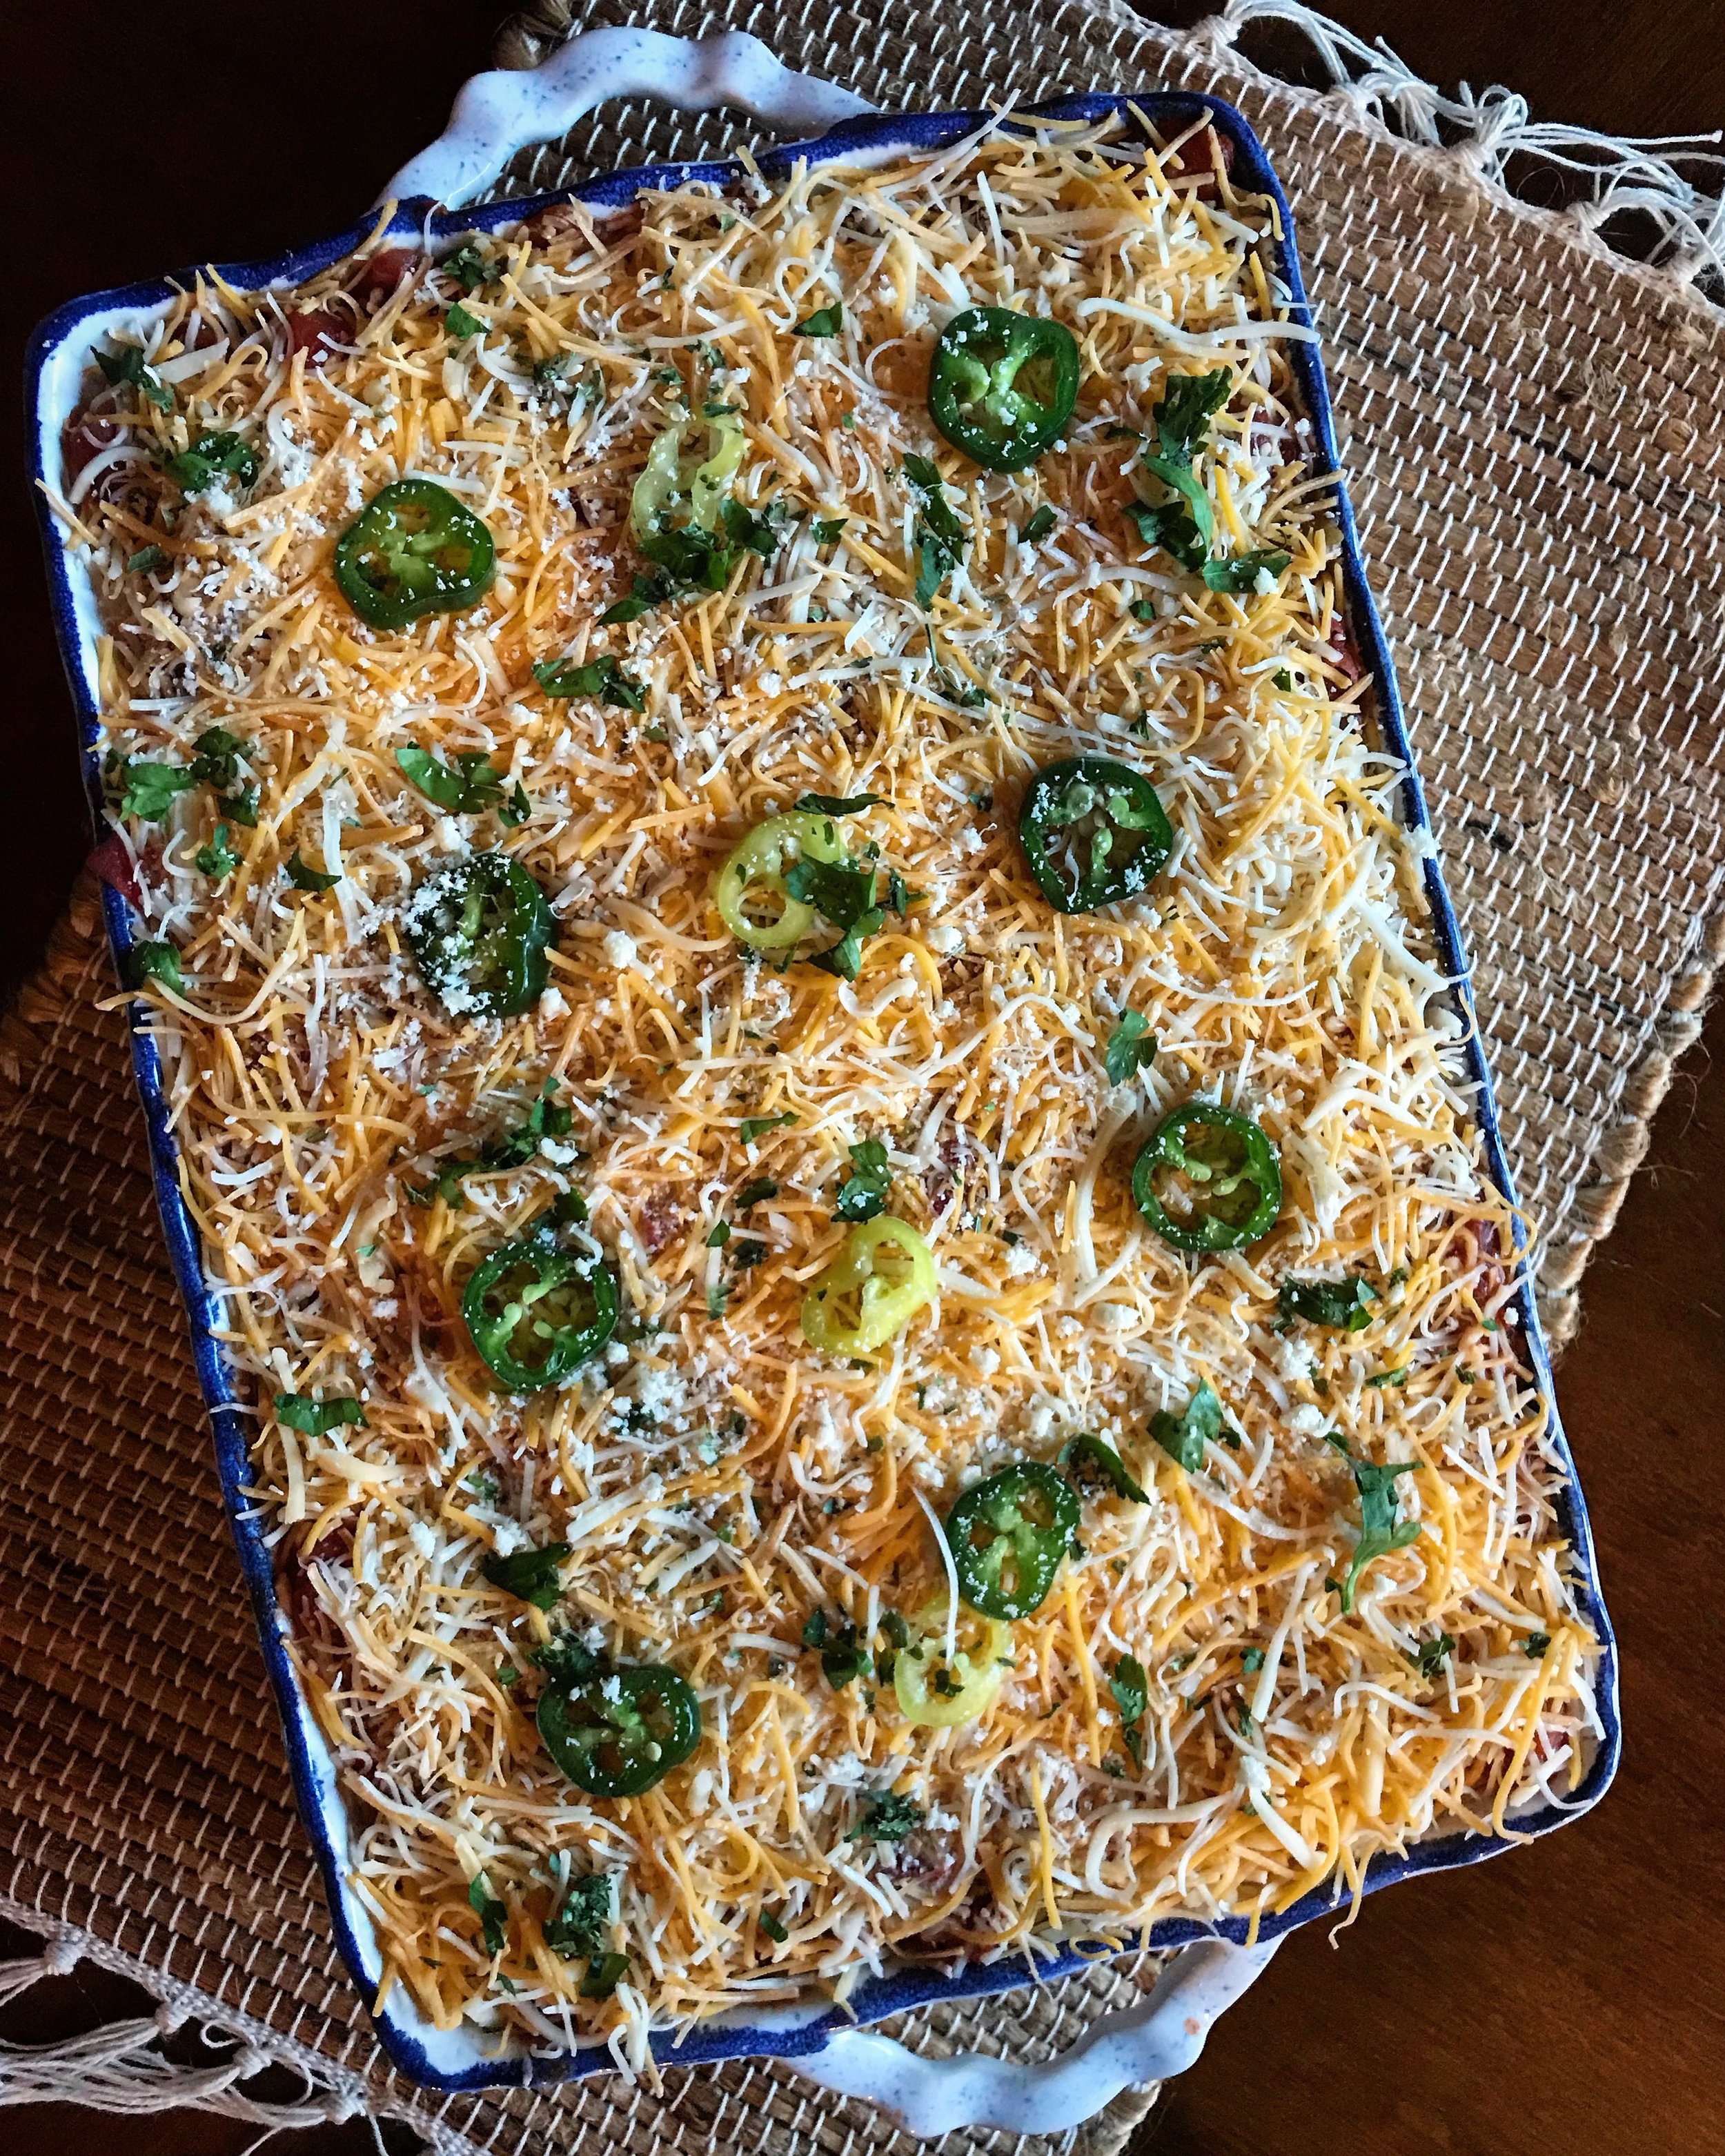
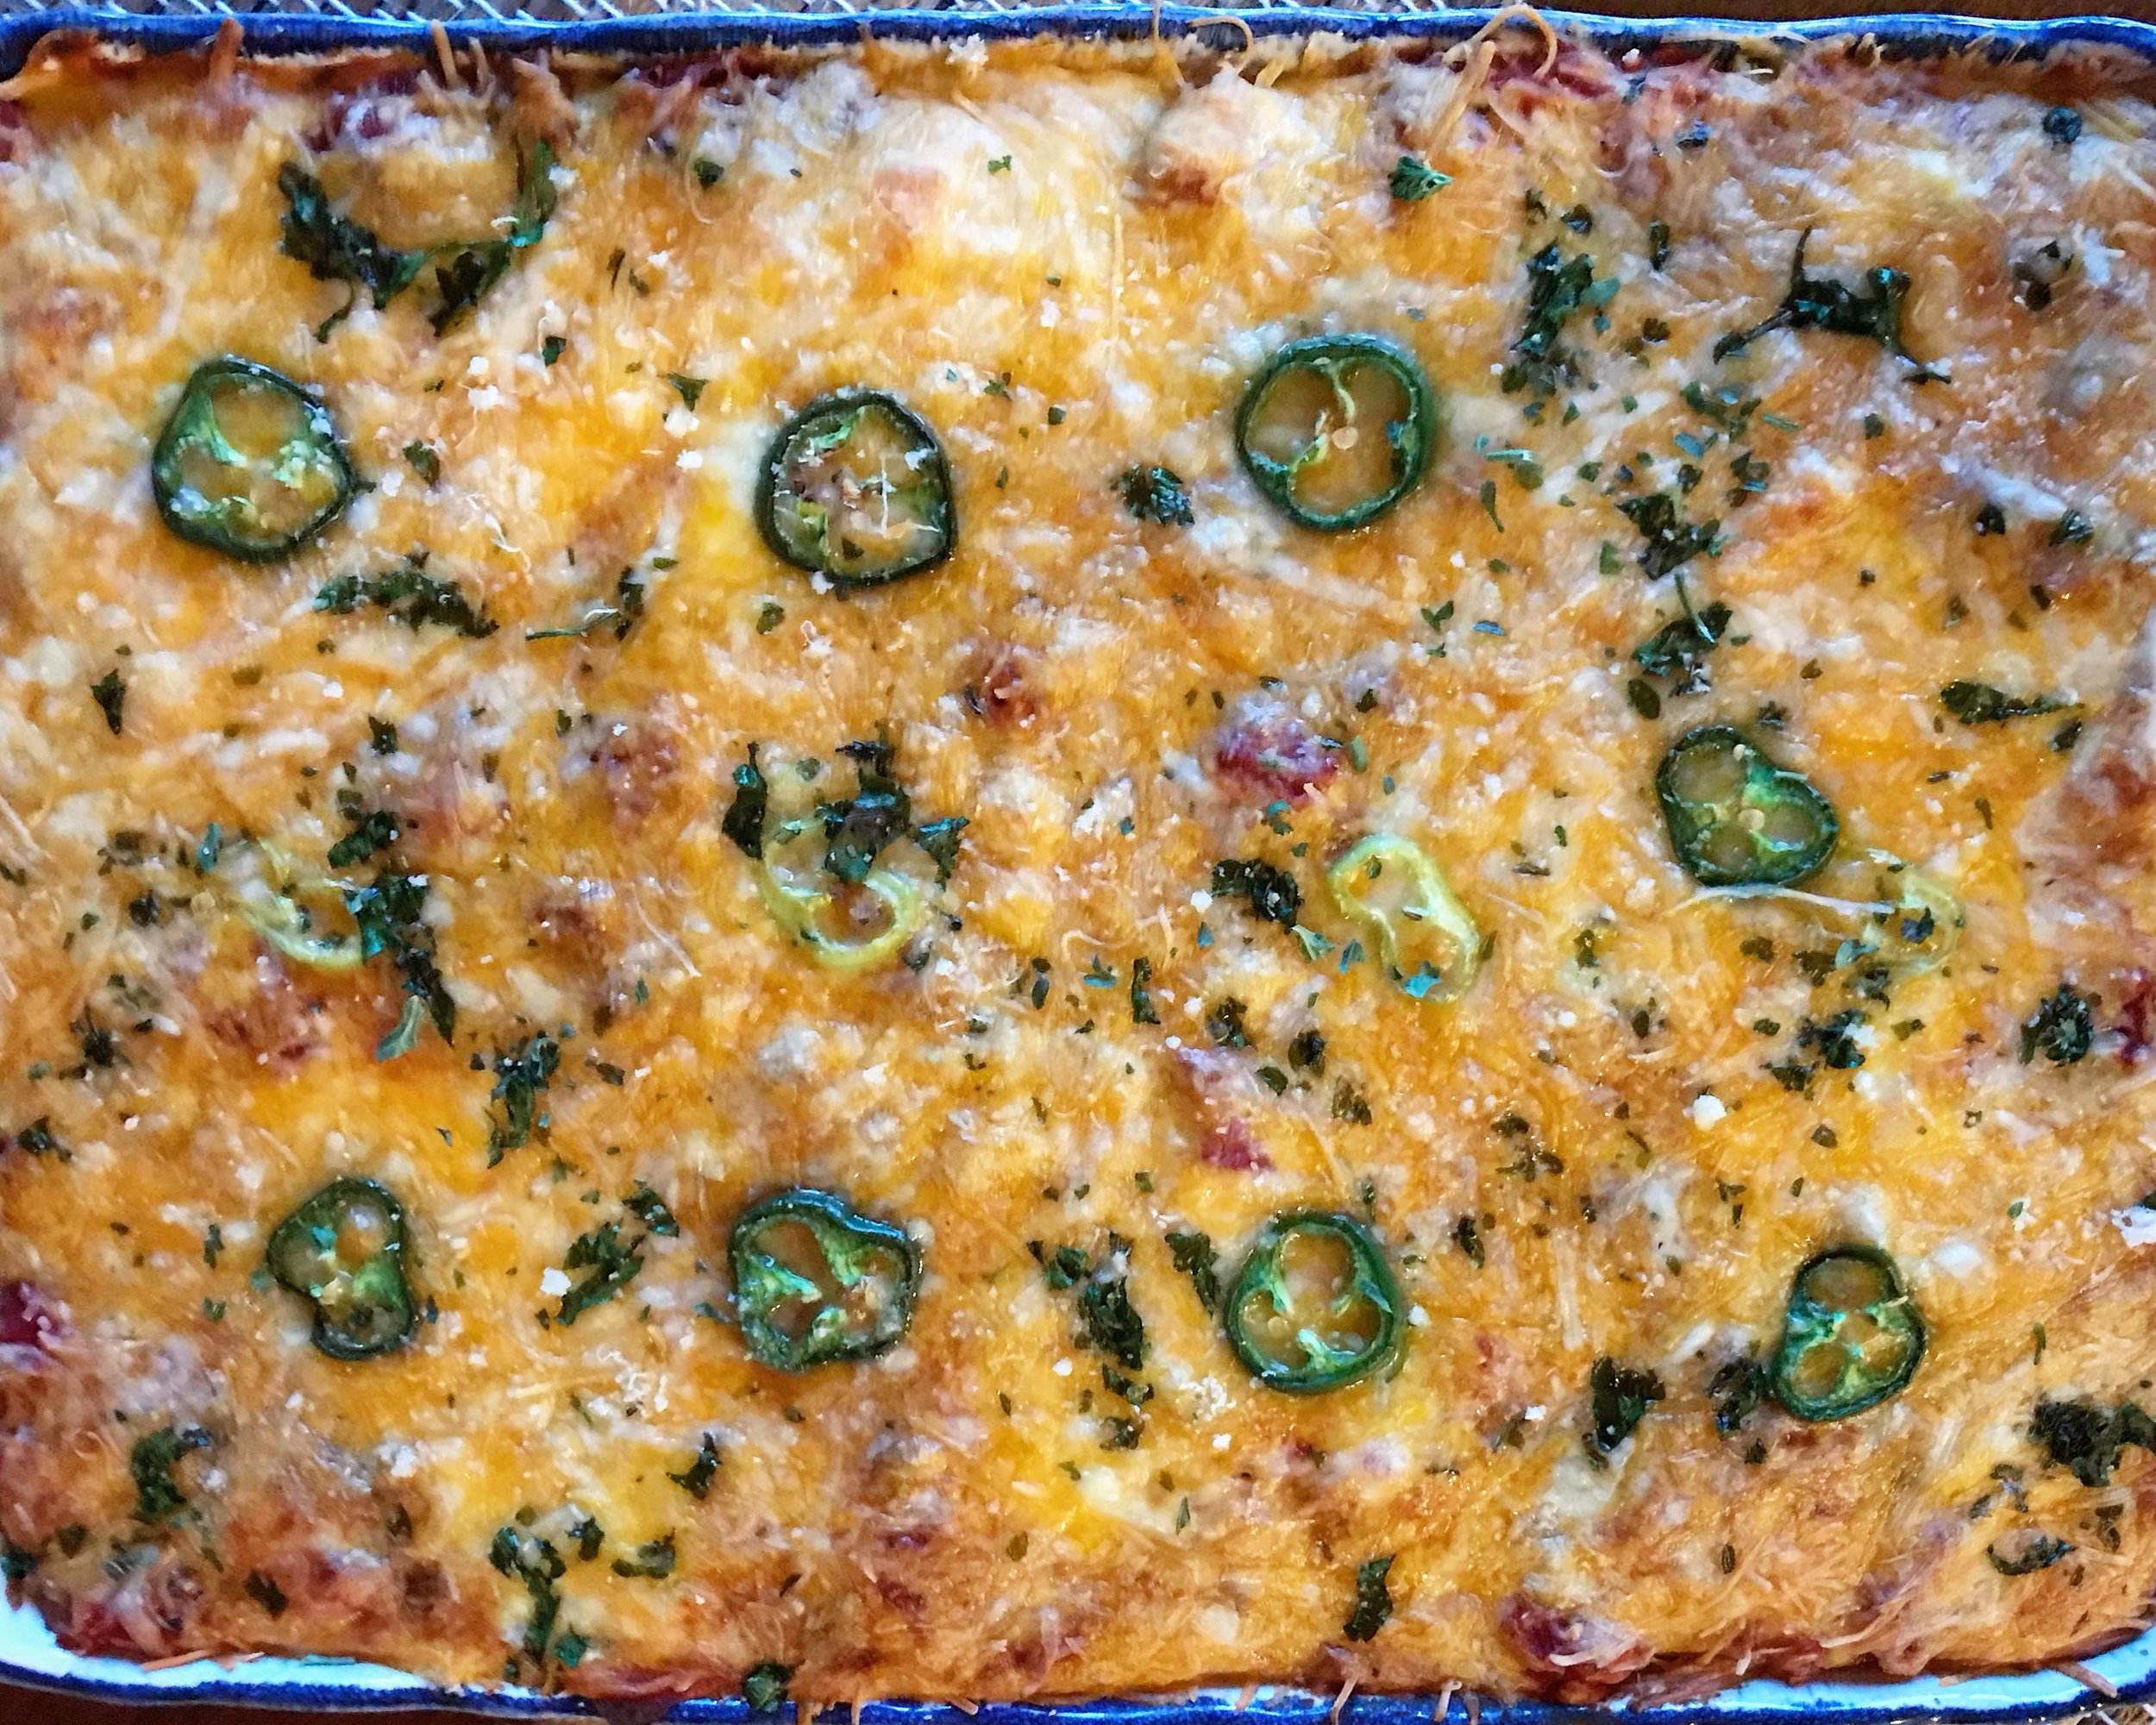
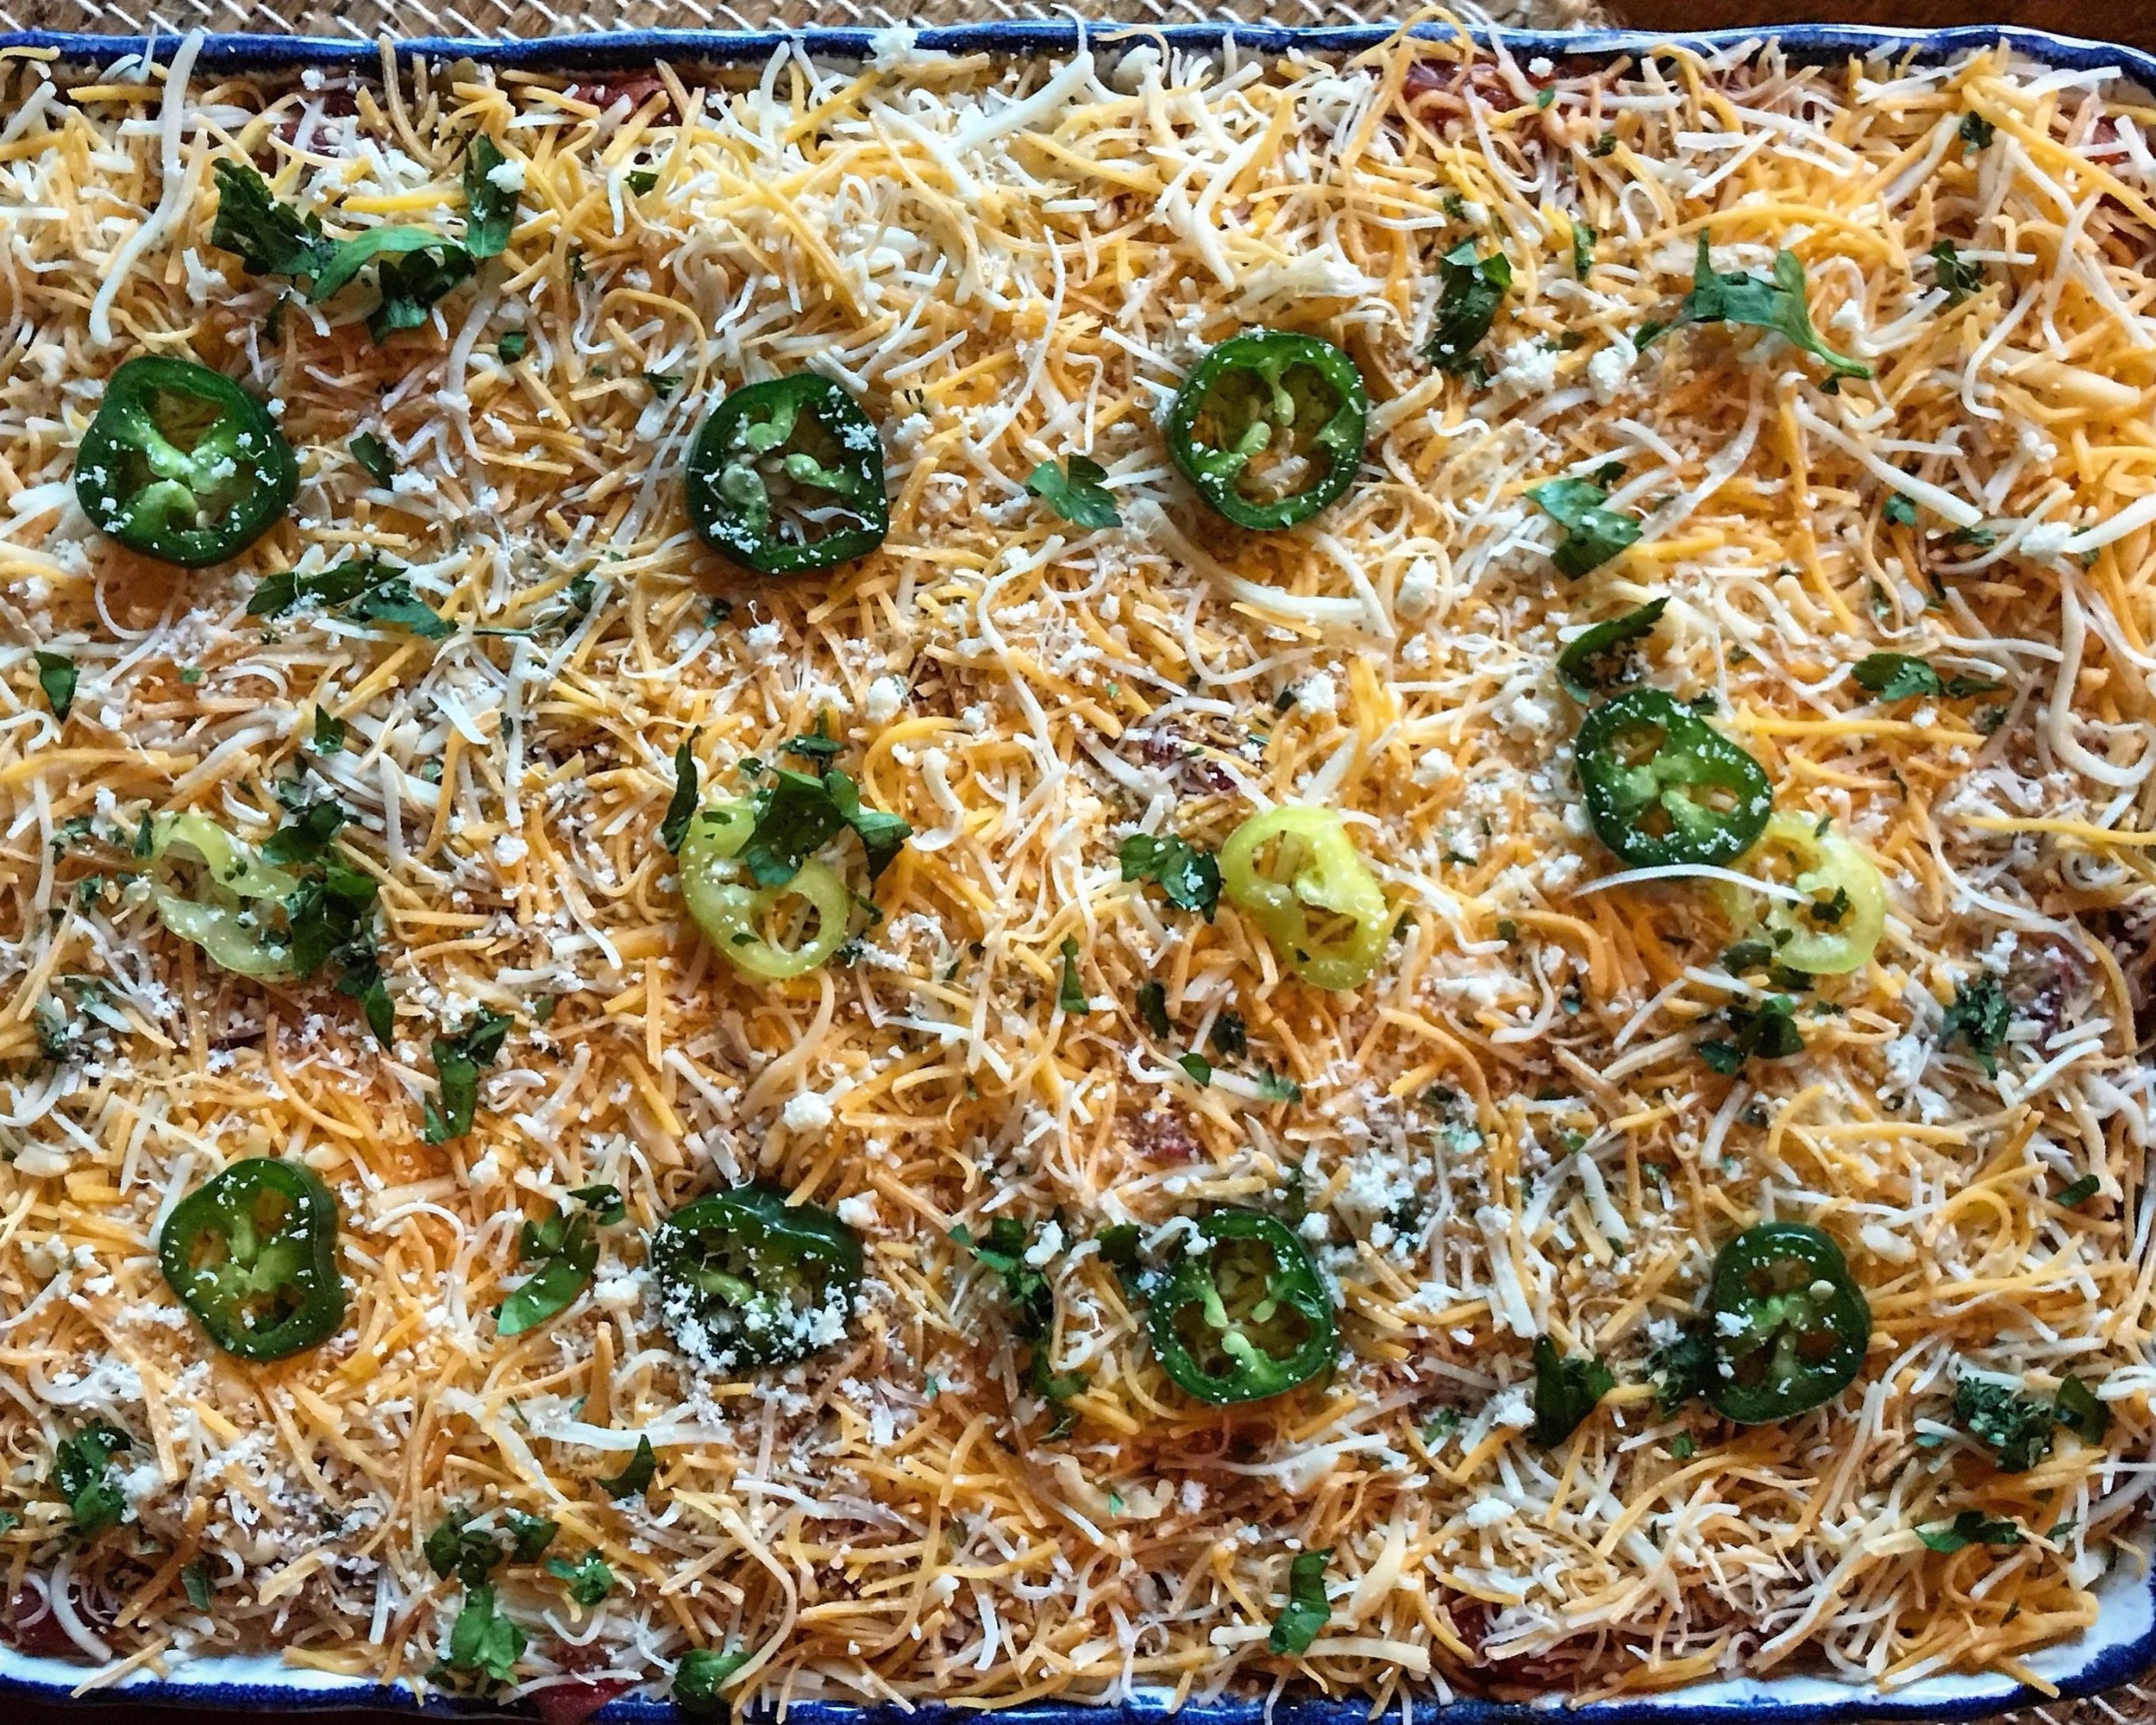
9. After laying down the last Lavash flatbread strips, cover them with 2/3's of a cup of salsa and the remaining cheese-then garnish with sliced jalapeno and some of the chopped parsley and cilantro..
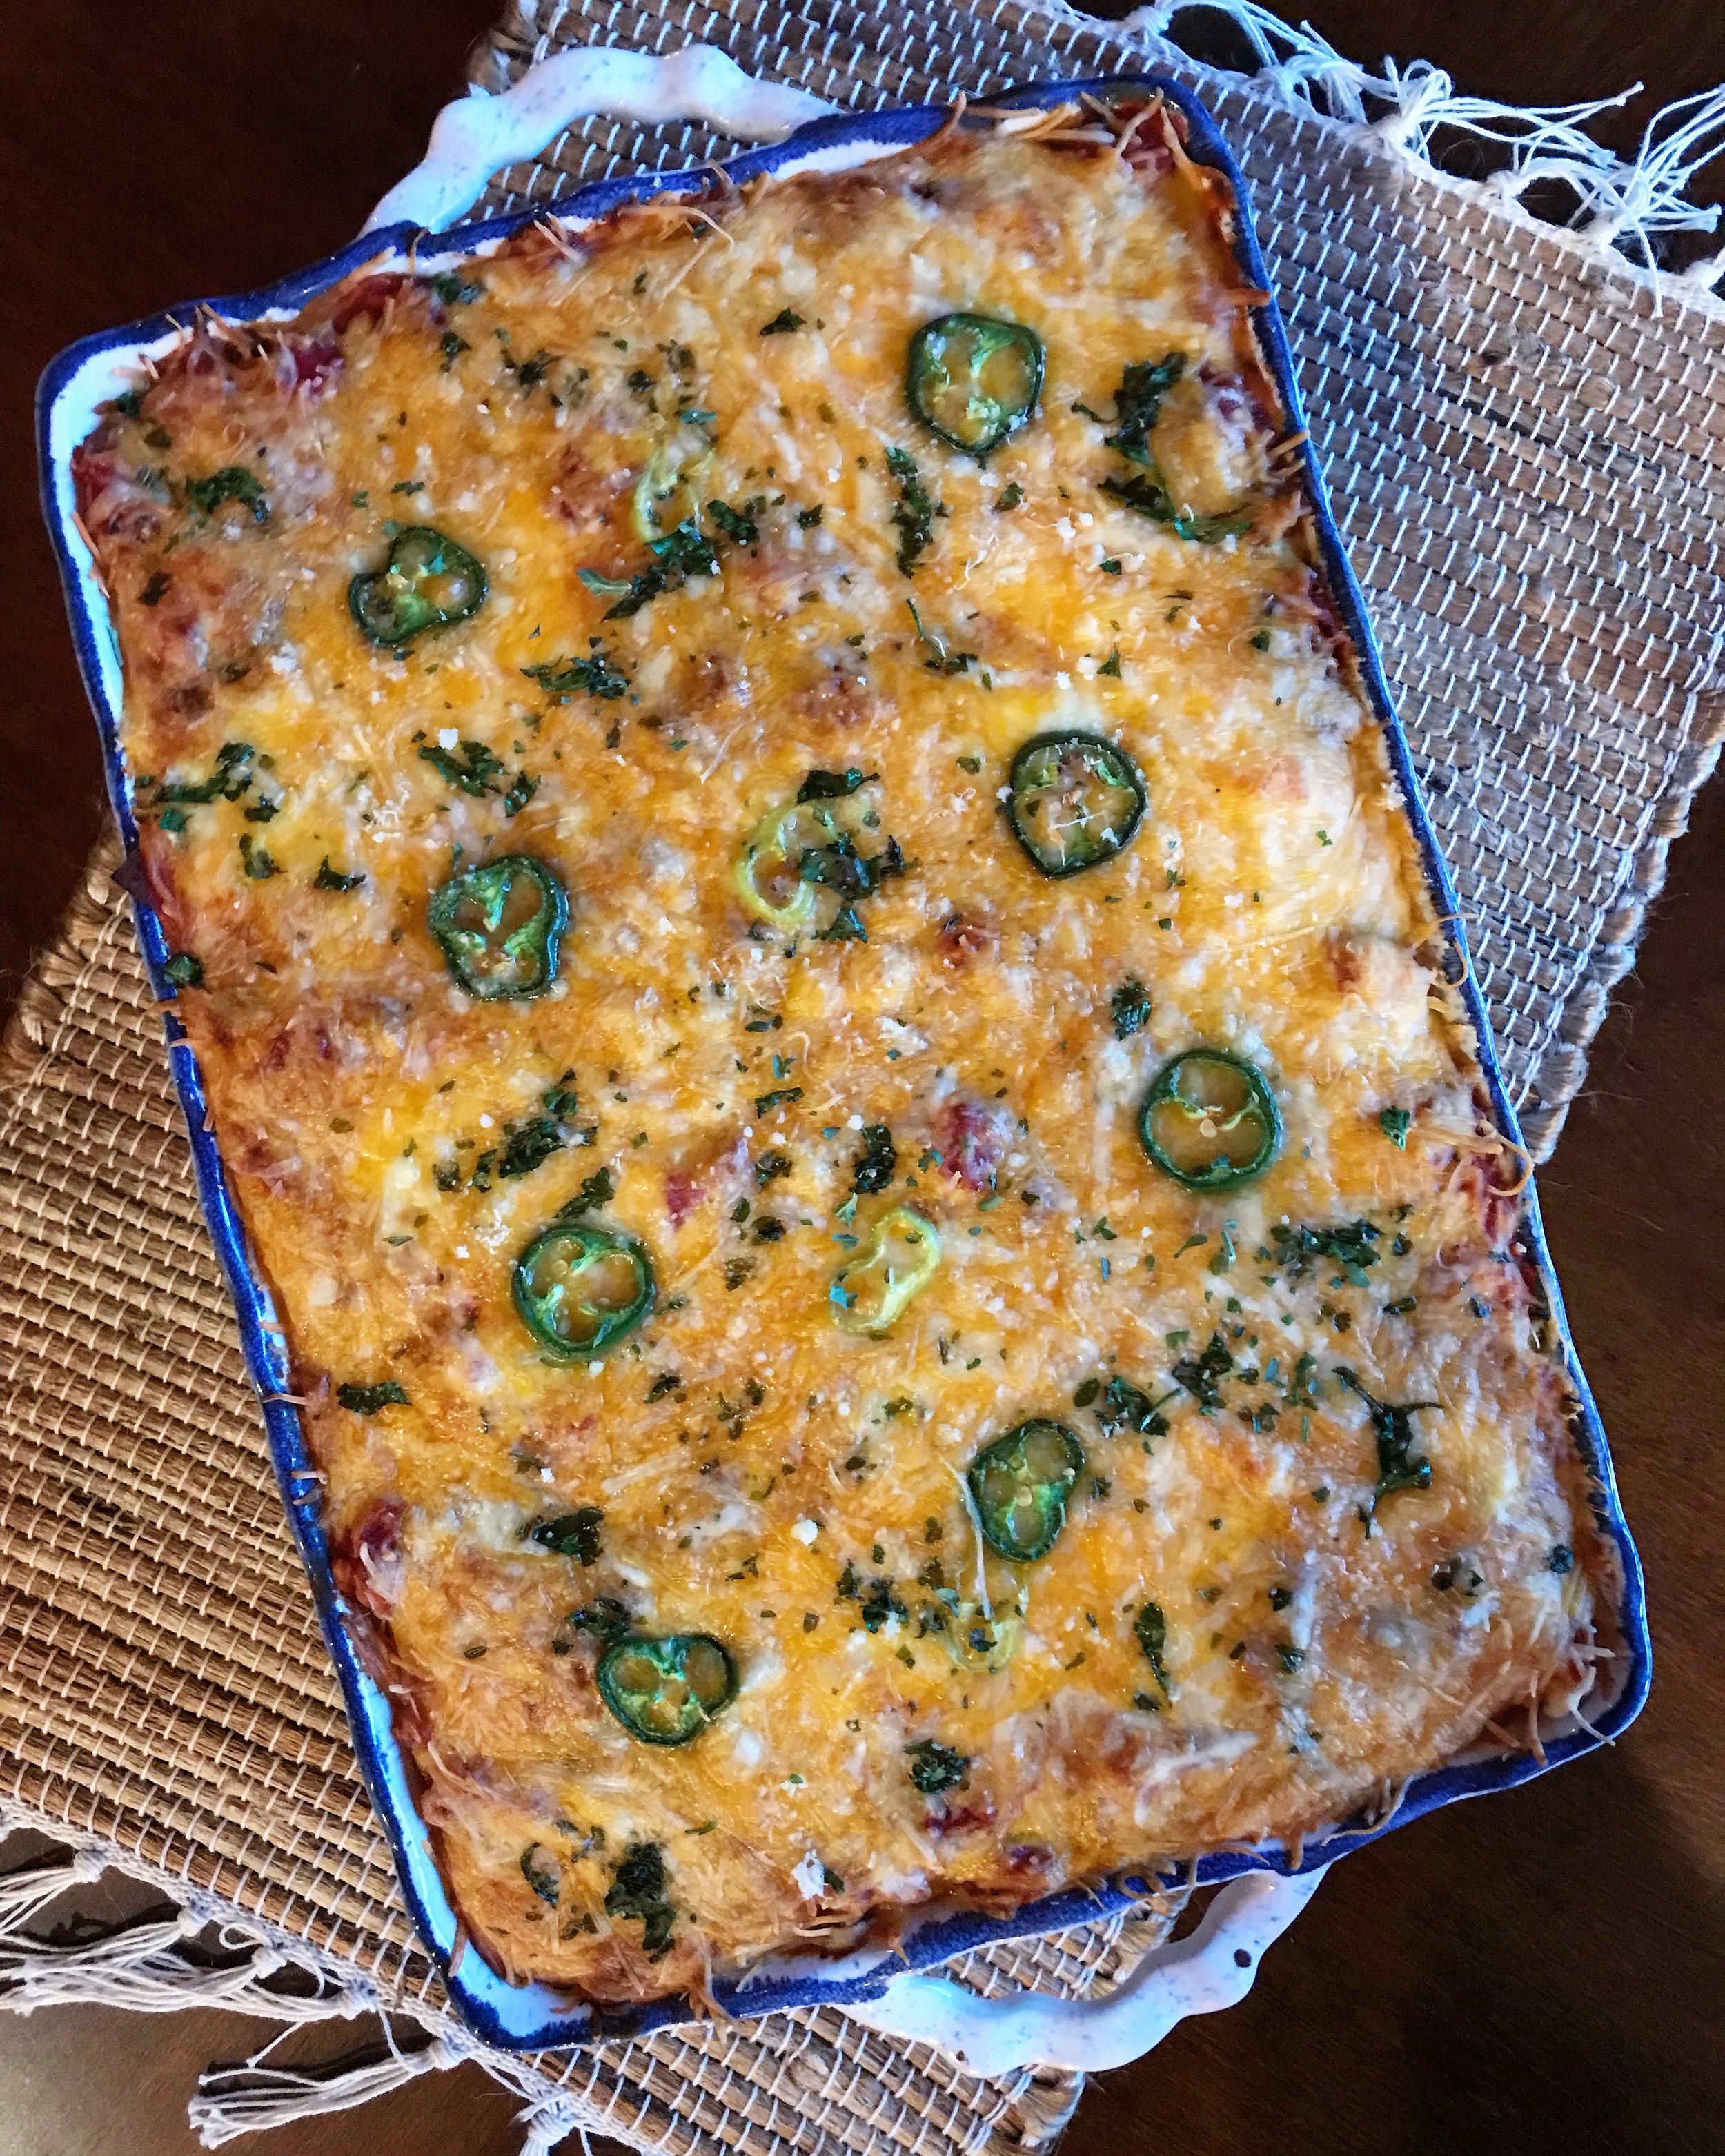
10. Place into the oven for 25 to 30 minutes, until warmed through and the cheese is melted and golden brown. Serve with low fat sour cream, avocado slices, torn cilantro leaves and additional salsa or picante sauce, if desired..

Notes:
1. The "Toufayan Bakery" Lavash Flatbread I buy comes in 2 serving sheets with a perforation in the center--3 servings fit my pan perfectly but you may need to cut or slice depending on brand..
2. I use the "Toufayan Bakery" Lavash Plus with Whole Grain & Flax for this dish because of the higher protein and fiber, with low calories. (Each serving is 80 cals, 3 g fat, 13 g carbs, 5 g fiber & 6 g protein) This helps to keep the overall fat and carbs low while raising the fiber and protein a nice amount without affecting the taste..
3. You can add a small can of sauce to the ground beef if you feel its to thick, a 6 to 8 ounce can of plain low sodium sauce is preferable..
4. You can use completely fat free cheese (though that's not my preference) or all ground turkey instead of beef & turkey mixed..
5. You could also use different Flax roll ups or wraps; Damascus Bakery makes a high protein low carb flax wrap that would work great in this dish..


"Linguine and Clam Sauce" with "Sun-Dried Tomatoes and Pepperoni"


It's been a very busy couple of months here at "Definitely Delish"

Not only has it been fourteen hour work days at my regular job, the travel company business, seeing my beautiful goddaughter as much as possible and birthdays..

I've also been working in the little off time I have on creating a surprise for my sweetheart at home—an outdoor spa oasis with hot tub, hanging lights, lanterns and statues..

This took quite a bit of my little free time I had left, but the finished results looks great and I'm happy with it..


That's not to say I haven't on occasion been cooking but it's mostly just been dishes I've done a whole lot of times before or have already blogged about, so it wouldn't do to repeat..

Now I've decided to get to you a new, long overdue recipe—an that is this delish dish..

A yummy, flavorful helping of "Linguine in White Clam Sauce" but with a kick—a extra dose of taste has been added with the addition of pepperoni and sun-dried tomatoes to the mix..

So sit back, enjoy and try it for yourself—because I think you'll find it is oh so "Definitely Delish"


"Kicked Up Linguine" with "White Clam Sauce" 

Ingredients:
1 pound linguine (I used GK-Skinny Pasta)
1/2 cup Olive Oil plus 1 tablespoon
1 tablespoon Butter
6 cloves Garlic, finely chopped
3/4 cup dry White Wine
2-3 tablespoons dry Sherry
18 Littleneck or Chowder Clams
1/4 cup Clam Juice
1/4 cup of Chicken Bone Broth
Sea Salt and freshly ground Black Pepper
1 tablespoon fresh Thyme
1/4 to 1/2 a cup Sun-dried Tomatoes in Oil (depending on personal taste)
1 small Zuchinni, matchstick cut with mandolin (or use big side of cheese grater for larger matchstick pieces)
2 ounces (or less) of sliced Pepperoni, cut into quarter wedges
1 tablespoon chopped fresh Italian, flat leafed Parsley (plus extra for garnish)

Directions:
1. Bring a large pot of salted water to a boil and cook the pasta, following the package instructions, until al dente..
2. Meanwhile, warm 1/2 cup of the olive oil, and tablespoon of butter, in a high-sided saucepan (big enough for your clams to rest in a single layer) set over  medium-high heat..
3. Add the garlic and cook until softened, about 2 minutes, until golden (Be careful not to burn)
4. Add the wine and sherry allowing it to cook away slightly, about 1 minute.. 
5. Add the clams, clam juice and chicken bone broth—an then season with sea salt and black pepper.. 

6. Add fresh thyme leaves and half the parsley—then cover pot and cook until the clams open. About 5 minutes..
7. Add drained sun-dried tomatoes (more or less depending on personal taste), pepperoni and zuchinni. Reduce heat to medium and stir to combine..
8. Remove from the heat and stir in the remaining parsley..
9. Drain the pasta (reserving a 1/2 cup of cooking liquid) and toss in a serving bowl with the remaining 1 tablespoon olive oil—adding reserved cooking liquid if needed..
10. Distribute the pasta evenly among six pasta bowls. Top each with equal portions of the sauce, and serve immediately garnished with parsley..

Notes:
1.
You can also toss the sauce with the pasta before distributing it to your pasta bowls..
2. Goes well with a nice light white wine, a Sauvignon Blanc or Chateu St. Michelle Reisling is nice..
3. Serve with Sesame Semolina Italian bread with butter..
4. You can also remove some of the clams from their shells, lightly chopping them and tossing with the sauce before serving..

"Fried Hot-Water Cornbread Bites"

It has been a busy few days or more of work on a cake for a baby shower along with all of the work me and my Sweetie are doing on the new Travel Business we started at "Superior Travel Destinations"

Everything has been coming along great but between the two projects, I haven't had the extra time or energy leftover after work for my regular cooking, let alone my blog..

So it's not every day that you have time to make some over intricate or "wow" meal; but sometimes, just sometimes, you get to wanting something simple and delicious..

When I think of that I think of Southern Comfort Style cuisine; ribs, pulled pork, red beans & rice, and cornbread..

Mmm, cornbread...

I don't know what it is about it but something in the taste of that buttery sweet goodness of cornbread makes it something I rarely pass up-no matter what kind of health or diet kick I might be on at the time..

It's really kind of funny if you think about it, but a boy from New York could live on southern comfort food for life-must've been New Orleans, the tastes, the sounds, the smells. I just can't get it out of my soul..

So enjoy these little bites of cornbread heaven and serve them next to your Jambalaya, Pulled Pork, Country Ribs or heat them up for breakfast with some Coffee & Chicory, Eggs and Andouille Sausage..

If you do, I'm sure that you'll find them "Definitely Delish"


"Fried Hot-Water Cornbread Bites"

Ingredients:
2 cups fine fresh Cornmeal
1/2 cup White Sugar
2 tablespoons of Baking Powder
1/3 cup of melted Butter
1 teaspoon Vanilla extract
1 1/2 teaspoons of fine Sea Salt or Himilayan Salt
2 cups, or more of Boiling Hot Water (as much as is needed to reach a batter like consistency)
Vegetable Oil for cooking

Directions:
1. In a large bowl combine the corn meal, baking powder, sugar, salt and stir to combine. Add melted butter and vanilla; then add boiling water, starting with about 1 1/2 cups of boiling water. Carefully stirring to combine..
2. Continue adding additional boiling water until a batter like consistency is reached. It should be pour-able, like pancake batter. (Different corn meals will require different amounts of water. Start with less and add more if you need it.)
3. I used an ebeliskiver pan to make small rounded bites. Heat on medium to medium high, brush with vegetable oil and pour batter into the rounded circles, as it starts to set gently flip the individual bites and cook till done.. 4. Should only take 4 to 6 minutes cooking time total depending on stove-top. If needed start with one to test your timing to completion before making an entire batch. (See Notes for Options)

Notes:
1. If you do not own an ebelskiver pan, add approximately a 1/4 inch of vegetable oil to a pan and heat to around 350 degrees Fahrenheit. Add about a 1/4 cup of batter to heated oil and cook till browning (3-4 minutes) then gently flip and cook and additional 3 minutes working in batches to retain oil temperature..
2. An option for the ebelskiver pan version is to cut out marble size squares of butter and freeze them for 30 minutes inside the freezer. Partially fill the ebelskiver pan with batter and as it cooks add frozen butter to center, gently pressing it into cooking batter--then covering with more batter before flipping, to add a kick of melty butter flavor to the center of each bite. (I did this myself, and it was delicious.)

"Gluten-Free Cauliflower Crust Pizza"

 I'm always seeing all of these wonderful healthy crust pizzas, that people share, all of the time..

Makes me so hungry for something I generally don't eat anymore, but do so definitely love..

So taking a little inspiration from those who have posted before me, I decided to go all in and create a couple of "healthy" pizzas of my very own..

This first one is made up of a deliciously flavorful crust of Roasted Cauliflower, Coconut flour, Parmesan and Mozzarella cheeses, and some spices..

It was actually much easier to do then expected and using parchment paper to help move it on and off the Pizza stone, during cooking, made all the difference in the world..

So, literally, after 10 minutes of baking it was time to take it out and slide my other crust into the oven and decide what I should top this one with..

I made sure to have more than a few options available for me, and my Baby, and then left it up to her to decide..


After looking over everything, she went with the fresh mozzarella and basil..

So slathering the top with pizza sauce, placing some medallions of mozz' and scattering a couple of pinches of fresh cut basil—it was time to go back on the stone in the oven to finish cooking..

A handful of minutes later it was done and all ready to be devoured, added just a smidgen of shaved Parmesan for good measure and began cutting into this one to give it a try..

Yum, it was so good and the crust was so tasty—it even held together just enough to be picked up just like a regular slice of pizza..

So very good and so very healthy with all of those natural ingredients with the gluten free, low carb crust..

So going to make this again because it was so—"Definitely Delish"


"Gluten-Free Cauliflower Crust Pizza"

Ingredients:
1 small to medium sized head of roasted cauliflower - should yield 2 to 3 cups once processed
1/4 teaspoon sea salt
1/2 teaspoon freeze-dried basil (crush it even more between your fingers)
1/2 teaspoon freeze-dried oregano (crush it even more between you fingers)
1/2 teaspoon garlic powder
1/2 teaspoon minced fresh Garlic
1/4 cup shredded parmesan cheese
1/4 cup 2% mozzarella cheese
1 egg
2-3 tablespoons coconut flour
Toppings:
Pizza sauce-homemade or store bought
Cheese fresh or pre shredded mozzarella
Toppings, whatever you enjoy.....

Directions:
1. Place a pizza stone in the oven, or baking sheet if you don't have a pizza stone. Preheat oven to 450 degrees..
2. On a cutting board, place a large piece of parchment paper and spray it with nonstick cooking oil..
3. Wash and throughly dry a small head of cauliflower..
4. Cut off the florets, you don't need much stem. Place in baking dish and drizzle a tablespoon of olive oil and sprinkle a touch of salt..
5. Place in oven and roast for 20-30 minutes. Remove, and when cool enough to touch, place into food processor..
6. Pulse in your food processor for about 30 seconds, until you get powdery snow like cauliflower. You should have about 2 cups of cauliflower..
7. Scoop out cauliflower and place into a dish towel or cheesecloth and squeeze. You want to squeeze out as much water as possible. This will ensure you get a nice chewy pizza like crust instead of a crumbly mess.. 
8. Dump cauliflower into a bowl. Now add 1/4 cup parmesan cheese, 1/4 cup mozzarella cheese, 1/4 teaspoon kosher salt, 1/2 teaspoon freeze-dried basil (crush up the leaves even more between your fingers before adding), 1/2 teaspoon freeze-dried oregano (crush up the leaves even more between your fingers before adding), 1/2 teaspoon garlic powder (not garlic salt), minced fresh garlic and a dash of red pepper if you want..
9. I also added 2-3 tablespoons of coconut flour at this time. Now add your egg and mix away. Hands tend to work best, I'll wear those throw away gloves sometimes so as to be able too have clean hands again when needed..

10. Once mixed together, use your hands to form the dough into a crust on your oiled parchment paper. Pat it down throughly, you want it nice and tightly formed together. Don't make it too thick or thin either. (I used the outer ring of a spring-form pan to ensure a nice circular crust..
11. Using a cutting board slide the parchment paper onto your hot pizza stone or baking sheet in the oven. Bake for 8 - 11 minutes, until it starts to turn golden brown. Remove from oven... (Just eye the crust the last few minutes to ensure you don't under or over cook it)
12. Add however much sauce, cheese, and toppings you want. I'm not gonna give you measurements for this. You should know how you like your pizza - this is your personal taste that matters..
13. Slide parchment with topped pizza back in the hot oven and cook for another 5 to 7 minutes until the cheese is melted and slightly golden....
14. Test your patience and allow it to cool for a minute or two. Probably closer to two. Then using a pizza cutter and a spatula serve up your delicious gluten-free cauliflower crust pizza!

Notes:
1. It makes a big difference oiling the parchment paper before forming the crust on it and using a pizza stone in the oven..
2. You'll want to have the oven pre-heated well ahead to allow the stone to be heated completely..
3. An average size head of cauliflower is fine, you don't want to have much more then 2 cups of processed cauliflower after roasting..
4. Can use un-roasted cauliflower as well— just rinse, remove florets, process into snow and microwave for 4 minutes on a plate before squeezing liquid out with cheese cloth..

"Roasted Cauliflower, Broccoli & Brussel Sprout Soup"

I love roasting and eating vegetables..

I mean, if I can throw it onto sheet pan and drizzle it with oil—I will..

This recipe takes a simple side dish at dinner and adds in a few ingredients to create a perfect lunchtime or supper meal that's wonderful during these cold northeastern winters..

One of the first things I started with here is deciding on a mix of vegetables—so taking two recipes from my Thanksgiving side dish post, back in October, I got to work on what would become this delish soup recipe..

Going almost half Brussels sprouts and half cauliflower, with some broccoli thrown in for good measure—I tossed it all down onto my sheet pan and drizzled it with quality extra virgin olive oil with a little fine sea salt & pepper to finish. Then into the oven it went..

Truly I love simple recipes like this with just a few dishes needed; one pan, one pot a knife and a spoon—what could be simpler and leave less work for you afterwards then that. Well a skillet meal like my frittatas, and mexi-skillet recipe, but I digress..

While my veggies went about becoming all roasty browned and tasty; I prepped the base for my soup which included some lean prosciutto, shallots, garlic & chicken stock..


Quicker than you'd think it was time to pull my roasty toasty vegetables out of the oven and spoon them into the pot with the soup base and bring it up to a nice low simmer for about 10 minutes..

Here is where an immersion blender is key if you want to save on spatters, dribbles, spills and sloshing as you attempt to blend a little of the soup at a time and then dumping into another dish—you're guaranteed to add to your after cooking clean up; and really, who wants that, right!


A few minutes of immersion blending later and you have a supremely thick soup that just needs a little seasoning for taste before it's ready to serve..

Garnish each bowl with some reserved roasted veggies, the slightly crispy cooked prosciutto and some shredded Manchego cheese an you'll have a beautiful dish that's sure to please..

I loved it and I'm sure if you try it for yourself that you will to; because it is, oh so "Definitely Delish"

"Roasted Cauliflower, Broccoli & Brussels Sprout Soup" 

Ingredients:
16 oz cauliflower florets
16 oz Brussels sprouts, halved
8 oz. Broccoli florets
4 oz. lean Prosciutto, cut into small pieces (see notes for vegan options)
3-4 tbsp Extra Virgin Olive Oil
2 tablespoons Butter (see notes)
1/4 cup Shallots, chopped
2 cloves of Garlic, minced
3 1/2 cups low sodium Chicken Stock (see notes)
1 cup Vegetable Broth
1/2 teaspoon fine Sea Salt, plus more to taste
White Pepper, to taste
1 tablespoon fresh chopped Italian Parsley
Natural Olive Oil Spray

Directions:
1. Preheat oven to 450 degrees Fahrenheit..
2. Spray a large baking sheet with the Olive Oil Spray. Place the cauliflower, broccoli and Brussels sprouts cut side down on the baking sheet, drizzle with 2 tablespoons of olive oil and sprinkle with sea salt—then roast on the bottom third of the oven 25 minutes, tossing half way until slightly browned..
3. Meanwhile, add 1 tablespoon of oil to your soup pot on medium heat and add your pieces of prosciutto—cooking until browned, then remove from the pot and reserve for later..
4. Now lower the temperature of the pot to low heat and melt the butter, then add the shallots & garlic. Cook until translucent, about 5 minutes..
5. Add the chicken stock and simmer 5 minutes..

6. Shut the oven, reserve about 1 cup or more of the roasted vegetables and keep warm on the baking sheet..
7. Transfer the rest to the pot and simmer for 5 minutes, covered..
8. Now, using an immersion blender, blend until a thick even consistency is reached. You may also enjoy it chunkier, so can stop when it reaches the style you enjoy..
9. Now simmer on low heat for 5 to 10 minutes, adding up to 1 cup of vegetable broth if thinning of the soup is needed. As well as adding sea salt and white pepper to taste. (Any last minute additions such as fresh herbs, rubbed sage, etc can be added to enhance the flavor if you desire)


Notes:
1. Serve in bowls topped with the some of the roasted vegetables, cooked prosciutto, chopped parsley and a drizzle of extra virgin olive oil..
2. You can also add a bit of fresh shredded 8 month Manchego cheese, which I did. (Optionally Romano or another cheese could be substituted) Serve immediately..


3. You can remove the prosciutto (or use vegan/vegetarian friendly option if available), substitute the butter for a non dairy version (Olio olive oil spread, or another) and replace the chicken stock with vegetable broth to make this soup Vegetarian or Vegan friendly....

"Protein Packed Belgian Waffles"

Every once and awhile I get to wanting something I just don't eat anymore—usually..

When this happens; sometimes, just sometimes, I'll get creative and try to figure on how in creation I can achieve this without regretting almost immediately indulging in a treat of this kind..


Of course when I say this kind; what I'm referring too, as you can see from the photos, is nothing short of a stack of protein packed "Belgian Waffles" with "Gelato" and "Whipped Cream"

Today I was successful (though that's not always the case when trying a new technique) by using a mix of protein powder, flapjacked pancake mix, egg & egg whites, stevia, coconut oil, vanilla & almond extracts, cinnamon and almond milk..

An with a little wrangling, and a very short amount of time, I was able to create perfectly fluffy and delicious waffles..

Topped with a little low fat, no churn chocolate protein gelato made with cool whip and finished with whipped coconut cream—this delectably tasty dish was just full of protein, with none of the heavy carb regrets..

Definitely happy with this for a little "Breakfast for Dinner" after hitting the gym; because it was,
most assuredly, oh so "Definitely Delish"


"Protein Packed Waffles"

Ingredients:
2 scoops of Protein Powder (I use Quest Baking Protein-Unflavored)
1/4 cup FlapJacked Protein Pancake Mix (Any protein pancake mix, or gluten free substitute can be used)
2 Eggs, room temperature
1/2 cup of Unsweetened Almond Milk
1 teaspoon Baking Powder
1 teaspoon Baking Soda
1/4 teaspoon fine Sea Salt
1 teaspoon Vanilla Extract
1/2 teaspoon Almond Extract
1 teaspoon Sweetener (stevia, truvia, splenda, etc)
1 tablespoon Coconut Oil, liquified
Natural Cooking Spray
See Notes for Options & Additions

Directions:
1. Pre-heat waffle maker on medium high temperature. (Temperature and time may need adjustment due to differences in waffle makers)
2. Mix all dry ingredients together in a deep bowl with whisk adding any additional dry ingredients such as cinnamon..
3. Add cool liquid coconut oil (if heated to melt or another oil substitute), eggs, Almond milk, vanilla & Almond extracts..
4. Whisk ingredients together adding additional tablespoons of Almond milk if necessary and the batter was too dry. Let sit for a minute..
5. Using a spatula, gently fold any optional ingredients such as mini chocolate chips, blueberries or diced banana if so desired..

6. Spray the inside of your waffle maker with natural oil sprays (I use Pompeian brand natural grapeseed or coconut oils with no propellants)
7. Pour 1/4 to a 1/2 cup (depending on size) of batter out onto your waffle maker and close lid..
8. Cook for 1 to 2 minutes and check. (Some waffle makers are cooler on top like mine, so halfway through I'll flip my waffle with help of a small rubber spatula) Cook for another 30 seconds to 1 minute, till done..
9. Repeat with remaining batter till all waffles are finished..
10. Top with your choice of toppings or additions and enjoy..

Options:
1. Mix and match add ins such as more vanilla extract and blueberries, banana extract and diced banana, mini chocolate chips, cinnamon, pumpkin pie spice—use your imagination..
2. When I'm looking for extra protein on gym day I will substitute out some Almond milk for additional egg whites (or carton egg beaters) I'll add the 2 eggs, 1/4 cup of carton egg beater eggs (or more) and then add Almond milk till a nice batter like consistency is reached..
3. Toppings can include butter (or substitute, I use Olio light spread) pure maple syrup (or low sugar substitute), homemade whipped cream, fat free gelato (I make a fat free, naturally sweetened protein gelato) or a scoop of "Halo Top" Protein ice cream (which I love, yum)—fresh fruit, preserves or a variety of other options can be added, it's all about personal tastes..

"Pan Fried Gnocchi In Brown Butter Sage Sauce With Pumpkin"

Not quite ready to let go of the Fall season after the Thanksgiving holiday here in the U.S.

I know, I know. We all look forward to those Winter holidays; whether it's for the presents, the snow or the camaraderie—me though, I love Fall and this year it seemed to pass all to quickly...

So as the months prepare to change and all the craziness of December shopping, cooking and running around gets prepared to start—I decided to treat myself to one more dish full of pumpkin, an spice and everything nice...

Hope you'll enjoy it and hope as well that you all have a very blessed and happy holiday season whatever you and yours may celebrate...


"Pan Fried Gnocchi" in a "Brown Butter Sage Sauce" with "Pumpkin"

Ingredients:
For the Gnocchi:
1 pound Gnocchi (Store bought or see Recipe in Notes)
3 Tbs. unsalted Butter, cut into 3 even pieces
2 tablespoons of Extra Virgin Olive Oil
1 teaspoon Sea Salt
For the Sauce:
12 Tbs. unsalted Butter, cut into 1-inch cubes
10 large fresh Sage leaves, half of them minced
1 cup Pumpkin Puree
2 tablespoons Dark Brown Sugar
1/2 teaspoon of Pumpkin Spice
Fine Sea salt & freshly ground White Pepper to taste
For the Garnish:
Fresh Pumpkin Seeds
1 tablespoon of Cinnamon Sugar
1-2 teaspoons of butter or oil-optional
Fresh chopped parsley or sage for garnish-optional

Directions:
Cook the Gnocchi:
1. Bring a large pot of well-salted water to a boil over high heat. Add about one-third of the gnocchi..
2. To get the gnocchi into the boiling water, fold the parchment ends to form a chute and gently shake the gnocchi out, taking care not to clump them together as you drop them in..
3. Give one gentle stir, wait until the gnocchi all float to the surface of the water, and then cook them for 1 minute..
4. Meanwhile, heat 1 Tbs. of the butter, and 2 teaspoons olive oil in a 12-inch nonstick skillet over medium-high heat..
5. When the butter is completely melted, use a large slotted spoon or a strainer to transfer the cooked gnocchi from the boiling water to the skillet, shaking off as much water as possible first. The gnocchi should form a single layer in the skillet. (If the butter is melted before the gnocchi cook, take it off the heat; if the gnocchi cook before the butter is fully melted, it’s fine to add the gnocchi.) Sprinkle with 1/4 tsp. salt and cook, shaking the pan occasionally to turn the gnocchi, until they’re lightly browned, about 2 minutes..
6. Transfer to a large plate. Repeat with the remaining gnocchi..
Make the Sauce:
1. Wipe the skillet clean if necessary. Put it over medium-high heat and add the butter..
2. When the butter has almost completely melted, stir in the sage leaves. 3. Cook, stirring occasionally, until the butter turns a light brown color (be careful not to let it burn) and the sage leaves darken and crisp up slightly, 2 to 3 minutes..
4. Stir in pumpkin, pumpkin spice and brown sugar then remove from heat..
5. Add the reserved gnocchi and toss to coat well. Season to taste with salt and pepper. Serve immediately.
Garnish:
1. Toast pumpkin seeds in a skillet over medium heat for several minutes, toss with cinnamon sugar and allow to cool on a piece of parchment paper till ready to use. (May add a small amount of butter or oil with the seeds when toasting to allow the cinnamon sugar to stick more, but seeds will be tacky to the touch)

Notes: "For Gnocchi Recipe"
Ingredients:
3 large baking (Idaho) Potatoes (about 1 3/4 pounds), scrubbed
1 large Egg
1 teaspoon Sea Salt
1/4 teaspoon freshly ground White Pepper
Pinch of freshly grated Nutmeg
1/4 freshly grated Parmigiano-Reggiano cheese
2 cups unbleached all-purpose Flour, or as needed

Directions:
1. Place the potatoes in a large pot with enough cold water to cover. Bring the water to a boil and cook, partially covered, until the potatoes are easily pierced with a skewer but the skins are not split, about 35 minutes. (Alternatively, the potatoes can be baked in a preheated 400 degree oven until tender, about 40 minutes.)
2. Drain the potatoes and let them stand just until cool enough to handle. (The hotter the potatoes are when they are peeled and riced, the lighter the gnocchi will be.)
3. Working quickly and protecting the hand that holds the potatoes with a folded kitchen towel or oven mitt, scrape the skin from the potato with a paring knife..
4. Press the peeled potatoes through a potato ricer. Alternatively, the potatoes can be passed through a food mill fitted with the fine disc, but a ricer makes fluffier potatoes and therefore lighter gnocchi..
5. Spread the riced potatoes into a thin, even layer on the work surface, without pressing them or compacting them. Let them cool completely.
6. In a small bowl, beat the egg, salt, pepper, and nutmeg together. Gather the cold potatoes into a mound and form a well in the center. Pour the egg mixture into the well..
7. Knead the potato and egg mixtures together with both hands, gradually adding the grated cheese and enough of the flour, about 1 1/2 cups, to form a smooth but slightly sticky dough..
8. It should take no longer than 3 minutes to work the flour into the potato mixture; remember, the longer the dough is kneaded, the more flour it will require and the heavier it will become..
9. As you knead the dough, it will stick to your hands and to the work surface: Repeatedly rub this rough dough from your hands and scrape it with a knife or dough scraper from the work surface back into the dough as you knead..
10. Wash and dry your hands. Dust the dough, your hands, and the work surface lightly with some of the remaining flour. Cut the dough into six equal pieces and set off to one side of the work surface. Place one piece of dough in front of you and pat it into a rough oblong..
11. Using both hands, in a smooth back-and-forth motion and exerting light downward pressure, roll the dough into a rope 1/2 inch thick, flouring the dough if necessary as you roll to keep it from sticking. (When you first begin making gnocchi, until your hands get the feel of the dough, you may find it easier to cut each piece of dough in half to roll it.)
12. Slice the ropes into 1/2-inch-thick rounds. Sprinkle the rounds lightly with flour and roll each piece quickly between your palms into a rough ball, flouring the dough and your hands as needed to prevent sticking..
13. Hold the tines of a fork at a 45-degree angle to the table with the concave part facing up. Dip the tip of your thumb in flour. Take one ball of dough and with the tip of your thumb, press the dough lightly against the tines of the fork as you roll it downward toward the tips of the tines. As the dough wraps around the tip of your thumb, it will form into a dumpling with a deep indentation on one side and a ridged surface on the other..
14. Set on a baking sheet lined with a floured kitchen towel and continue forming gnocchi from the remaining dough balls. Repeat the whole process with the remaining pieces of dough. At this point the gnocchi must be cooked immediately or frozen..

"Fall Colors"

"Dark Chocolate Popcorn Granola Bars"

"Dark Chocolate Granola Bars"

I'm always fiddling around the kitchen playing with this or that recipe and though not everything is a home run the first time out, more often than not, I will still make something worthwhile and delicious to nosh on...

This one though was a definite hit; mixing the slightly buttery & salty taste of fresh made popcorn with the crunch of granola, the sweet tang of dried cranberries and nuttiness of chopped pecans enrobed in dark chocolate and honey to create something not unlike but so much better than a rice crispy treat...

"Streets of Salem in Fall"

Decadent, Delectable & Delicious—truly this on the go snack, or late night treat, tastes almost to sinful to eat—but it's full of so much organic, healthy and natural goodness that you can most definitely give yourself a pass and enjoy it no matter whether you're in full on fit mode or not...

I know I'm going to love snacking on this in the days ahead and I think you would too; because it is, oh so "Definitely Delish"

"Dark Chocolate Granola Bars"


"Dark Chocolate Popcorn Granola Bars"

Ingredients:
7 cups Organic Popcorn, popped
1 cup Organic Pecans, chopped
1 cup Dark Chocolate Chips
1/2 cup Cinnamon Granola (I used an Organic fresh mix from a Organic Market, but Bare Naked and other brands are good too)
3/4 cup Dried Cranberries (natural no sugar added)
2/3 cup natural, unfiltered & organic Raw Honey
1/2 cup fresh made ground Almond Butter (Natural Almond Butter is okay as well)
2 teaspoons natural Vanilla extract
1 teaspoon ground Cinnamon
1/4 teaspoon ground Cloves
1/4 teaspoon Sea Salt, finely ground

"Dark Chocolate Granola Bars"

Directions:
1. Make the popcorn fresh and then mix together with the pecans, chocolate chips, granola and cranberries in a large bowl. Stir, then set aside...
2. Place a generous amount of raw honey in a medium-sized saucepan set over medium-low heat. Bring it to a gentle boil, adjusting heat if necessary... 
3. After the honey is boiling then stir in your almond butter, and let it bubble for 1 minute. Turn off the heat and stir in the salt, vanilla, ground cloves and cinnamon...
4. Carefully pour the hot mixture over top of the popcorn and other ingredients, then mix together thoroughly...
5. Line a 13x9 inch baking pan with parchment paper and spray with a nonstick butter spray, then scoop out and evenly press the mixture into the pan...
6. Let it cool in the fridge for 15 minutes or more (loosely covered); then, when ready, remove it from the pan and slice it into squares  or bars to serve...
7. Store in a covered container for up to 5 days—or up to a week, or more, when refrigerated... 

"NOLA at Night"

"The Cubano-A Southeastern Sandwich Classic"

"Cuban Sandwich"

As you can see, the love of sandwiches has continued this week—from the deliciousness of "Pulled Pork" to the incredible merging of sweet and savory with the "Monte Cristo"

Now though I bring you that most delectable of Miami favorites, the "Cubano" or "Cuban Sandwich"


"Cubano"

As with Cuban bread, the origin of the Cuban sandwich (sometimes called a "Cuban mix," a "mixto," a "Cuban pressed sandwich," or a "Cubano") is murky and somewhat intriguing...

In the late 1800s and early 1900s, travel between Cuba and Florida was easy, especially from Key West and Tampa, and Cubans frequently sailed back and forth for employment, pleasure, and family visits...

"Cuban Pressed Sandwich"

Because of this constant and largely undocumented movement of people, culture and ideas, it is impossible to say exactly when or where the Cuban sandwich originated.—it's rumored, though, to have originated in Cuba or Key West before spreading in popularity from Tampa to Miami...

Wherever it came from, and whatever it's origins, you almost have to stop to try one in "Versailles" or another eatery in "Little Havana" just to indulge in some of the local flavor...

"Crashing Waves along the Keys"

If traveling to the sandy shores of Florida is out of the question though, why not sit back comfortably in your own home and try my very own tasty take on this Southeastern classic...

I think you'll find it to be oh so "Definitely Delish"


"Cuban Sammie"

"Classic Cuban Sandwich"

Ingredients:
8 oz. Brown Sugar Baked Pit Ham, sliced (see recipe section)
12 oz. Roasted Marinated Pork Shoulder, sliced (see recipe section)
8 oz. Emmentaler Swiss Cheese, thinly sliced
6 Half-Sour Dill Pickles, thinly sliced lengthwise
1 cup Sweet Cream Butter, softened
3 tablespoons Yellow Mustard, for brushing
3 tablespoons Mayonnaise, for brushing
6 (six to 9 inches long) soft Baguettes or Club rolls, split
lengthwise (If Cuban bread is unavailable)

"Cubano Sandwich"

Directions:
1. Heat a large cast-iron griddle or panini press. Add the ham slices to the griddle and cook over moderate heat, turning once, until browned in spots, about 1 minute. Transfer ham to a plate...
2. Generously butter the cut sides of each baguette(roll) and toast on the griddle over moderate heat until lightly browned, 1 to 2 minutes...
3. Transfer the baguettes to a work surface and generously brush the top cut sides with 2 teaspoons of mustard, and the bottom cut sides with 2 teaspoons of mayonnaise...
4. Layer the ham, emmentaler Swiss cheese, pickles  and pork on to each baguette and close the sandwiches...
5. Generously brush the outside of the sandwiches with more butter and set them on the griddle or press; if using a griddle, top the sandwiches with a large baking sheet and weigh it down with heavy cans or a cast-iron skillet...
6. Now cook the sandwiches over moderate heat until they’re browned and crisp on the outside and the cheese is melted, 3 minutes per side on a griddle or 3 minutes total in a press. Cut the "Cubanos" in half and serve while hot with some Yucca fries with banana ketchup or chips...

Notes:
Additional Recipes:

"Yucca Fries with Banana Ketchup"

"Yucca Fries with Banana Ketchup"

Ingredients:
Ketchup:
2 large ripe bananas, peeled and chopped
1 1/2 cups vegetable stock
1 small onion, halved and thinly sliced
1/2 cup water
4 whole pickled jalapeños, stems discarded, plus 2 tablespoon pickling liquid from the jar
1/4 cup thinly sliced garlic cloves
3 tablespoons finely chopped peeled fresh ginger
1 cup ketchup
1 cup lightly packed Basil
Sea Salt and Pepper

Fries:
3 pounds yucca (about 4 yucca)
Peanut oil, for frying
Sea Salt
Lime wedges, for serving

"Yucca Fries"

Directions:
Ketchup:
1. In a medium saucepan, combine the bananas with the vegetable stock, onion, water, pickled jalapeño, garlic and ginger and bring to a boil...
2. Simmer over moderate heat, stirring, until the bananas and onion are very tender, 15 minutes. Transfer to a blender and let cool slightly. Add the ketchup, basil and the jalapeño pickling liquid and puree until smooth...
3. Scrape the banana ketchup into a bowl and season with salt and pepper. Cover and refrigerate until chilled, about 30 minutes...
Fries:
1. Bring a large saucepan of salted water to a boil. Peel the yucca and cut into 3-inch lengths. Cut the lengths into 1/2-inch-thick wedges. Cook the yucca in the boiling water until tender, 10 to 15 minutes...
2. Drain well and spread on a baking sheet to cool and dry; discard any stringy pieces of yucca...
3. In a large saucepan, heat 1 1/2 inches of oil to 360 degrees. Set a rack over a baking sheet. Working in batches, fry the yucca, stirring gently to separate the wedges, until golden brown and crisp, 5 to 7 minutes...
4. Using a slotted spoon, transfer the wedges to the rack and season generously with salt. Serve right away with the banana ketchup and lime wedges...

"Waves Breaking Along the Florida Gulf"